
Climate Component
How to configure the Climate component in Ilevia Manager to control a thermostat or air conditioner, and how it is displayed in Ilevia Control.
Introduction
The Climate component allows you to acquire all the functions of your thermostat and control them from a single interface: temperature, on / off, mode, fan speed, and season.
Use cases
You can use this component to control all the thermostats in the house, giving you the option to manage them even when you are away from home.
The user wants to control the living room air conditioner so it can be turned on before returning from work.
Component properties
The component title and icon are fully customizable. We recommend consulting the guide to “Common properties”.
GUI
This component is created with the Graphic UI gateway.
Refer to the chapter “Gateway / protocols” for further information.
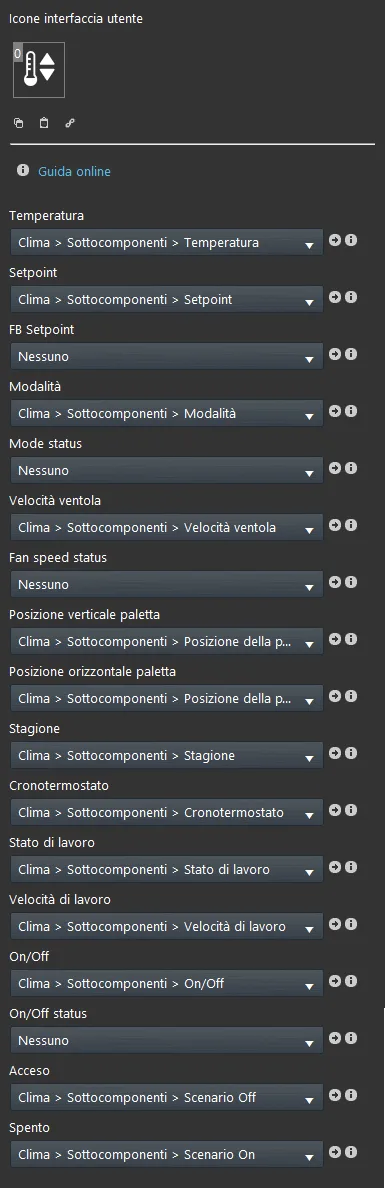
Temperature: Info component that displays the current temperature;
Setpoint: Set point component that allows you to increase or decrease the temperature;
FB Setpoint: Info component that shows the current Setpoint value as external feedback;
Mode: Option list component that allows you to select the thermostat mode based on the device settings;
Mode state: Option list component used to receive the selected mode status from the configured device.
Fan speed: Option list component that allows you to select the fan speed based on the device settings;
Fan speed state: component used to receive the selected fan speed status from the configured device.
Vertical vane position: Option list component that allows you to select the vertical vane direction (if the device supports it);
Horizontal vane position: Option list component that allows you to select the horizontal vane direction (if the device supports it);
Season: Option list component that allows you to select the season based on the device settings;
Thermostat scheduler: Chronothermostat component that allows you to set automatic or manual mode;
Work status: This is a colored info, Switch, text info component that shows the current operating status of the configured device;
Working speed: Info component used to display the current operating speed of the configured device;
On/Off: Option list component that allows you to choose whether to turn the device on or off (for remotes with on / off buttons);
On/Off status: Colored info, text info component used to display the current operating status of the configured device;
Power on: Scenario component to turn the device on (KNX Scenario or Ghost Scenario containing a switch);
Power off: Scenario component to turn the device off (KNX Scenario or Ghost Scenario containing a switch);
Help
Configuration of the Climate component can be completed simply by dragging the components. When you set the components in the parameters, you can use the option menu or drag them from the “Components” section.
Reminder before continuing:
Download and install the Logic module (Ilevia Logic plugin) to enable plugins (link);
After uploading the Ilevia project to the server, wait a couple of minutes for the logic to start.
Three display modes are available: “CLASSIC”, “MODAL”, and “HIDDEN”. More information on the component display modes.
Climate interface display
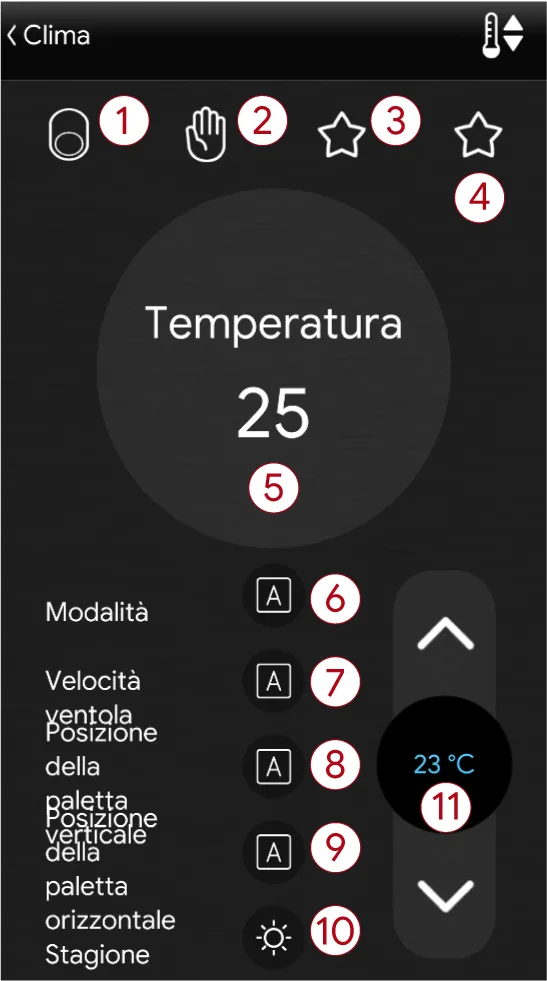
Below are all the elements that make up the Climate component interface in Ilevia Control.
Climate component interface elements
On / Off: this Switch component allows the user to turn the configured device on and off;
Chronothermostat: allows the user to choose between Manual and Automatic mode and to schedule the temperature hour by hour throughout the day. For more information, see the Chronothermostat component guide;
Power on: this Scenario can be configured to send a power-on signal to the device you are configuring;
Power off: this Scenario can be configured to send a power-off signal to the device you are configuring;
Temperature: this Info component allows you to display the temperature detected by a probe;
Mode: this option list allows the user to change the mode of the device you are configuring;
Fan speed: this option list allows the user to select the fan speed of the device you are configuring;
Vertical vane position: this option list allows the user to select the position of the vertical vanes, if the device allows it;
Horizontal vane position: this option list allows the user to select the position of the horizontal vanes, if the device allows it;
Season: option list that allows the user to choose the season to set on the device.
Setpoint: this Setpoint lets the user set the device’s heating or cooling setpoint.
Note: the subcomponents can be customized and removed from the project, or simply deselected from the corresponding drop-down menu in the properties of the Climate component.