
Components and Dummies in flows
How to use plant components in flows (lights, dimmers, shutters, thermostats, scenarios…) and Dummy nodes: inputs and outputs of all kinds, readings and commands, usage examples.
The component nodes are the contact point between the flow and the system: they read the state of a component in the ilevia Manager project and control it. The Dummy nodes have the same shape but are not bound to anything: they are used to draw and test the logic.
Using plant components
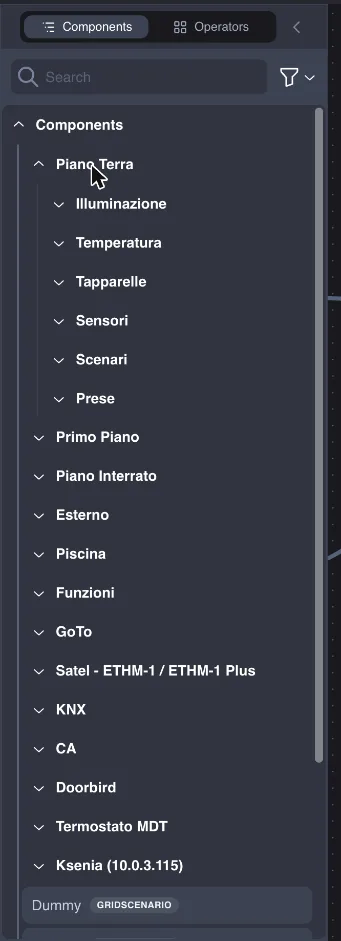
The Components window shows the components of the project loaded on the server, organized in the same groups as in ilevia Manager (for example Ground Floor > Lighting). Drag a component onto the sheet: it becomes a node with the component name and one dot for each value you can read or control.
Each value of a component node is both input and output:
the output (dot on the right) follows the component state: when someone switches on the light from the app, from a KNX button, or from a scenario, the output changes and the flow reacts;
the input (dot on the left) controls the component: a value that reaches the input is sent to the system, exactly like a command from the app.
The same component can appear in more than one flow and more than once in the same flow: for example on the left as an event source and on the right as a destination.
The Components window reads the project present on the server. If you add components in ilevia Manager, upload them to the server with Project > Upload to server and reload the editor to see them.
Component types
Node (Dummy) | Manager components | Values | Type |
|---|---|---|---|
Switch | Switch, on/off lights, sockets, relays | On / Off | Boolean |
Lock | Lock | Locked / Unlocked, Password | Boolean, String |
Slider | Slider | Value (0–100 %) | Number |
Dimmer | Dimmer | On / Off, Percentage (0–100 %) | Boolean, Number |
Info | Info (texts and values to display) | Value | String |
Dropdown | Combo | Value (index of the selected item) and the Values list | Number |
Seeker | Seeker | Scenario 0, Scenario 1 | Boolean |
Changeable Value | Tuner | Value | Number |
Setpoint | Setpoint, thermostat (Clima Thermostat) | Value (°C) | Number |
Shutter | Shutters and venetian blinds | Up / Open, Stop, Down / Close, Percentage, Venetian Up / Open, Venetian Down / Close, Venetian | Boolean, Number |
White Light | Dynamic white light | On / Off, Intensity (0–100 %), Temperature (3000–7200 K) | Boolean, Number |
RGB Light | Color light | On / Off, RGB, Red, Green, Blue (0–255), Hue (0–360), Saturation, Brightness (0–100) | Boolean, Color, Number |
Scenario | Scenario | On / Off (scenario start) | Boolean |
User Scenario | User-created scenarios in the app | On / Off | Boolean |
Numeric values are clamped to the component limits: a 120 sent to a dimmer becomes 100, a 7300 K sent to a White Light becomes 7200. To control a color light use **On / Off**, **Hue**, **Saturation** and **Brightness**: the **RGB**, **Red**, **Green** and **Blue** inputs currently are only for reading the color. **User Scenario** nodes can currently only be read.
Dummy nodes
A Dummy is a fake component: you find it in the Dummies category of the Operators window. It is used to:
draw the logic before the Manager project is ready;
test a flow: with the flows running, manually switch a Dummy Switch on and off or change the value of a Dummy Setpoint and see how the other nodes react;
share logic across different systems: all the examples in the guides use Dummy nodes, so the sample project opens anywhere.
When the logic works, replace the Dummy with the real component: drag the component from the Components window, connect the same wires, and remove the Dummy.
Usage examples
Light following another light. Connect the On / Off output of the corridor light to the On / Off input of the stair light: when you switch on the corridor, the stair light switches on too.
Shutters down at sunset. An Astronomy Clock node turns off when it gets dark: connect it through a NOT and a Trigger to the Down / Close input of the shutters.
Text in the app. A Javascript node builds a text string (for example "Consumption: 1.50 kW") and sends it to the Value input of an Info component, which displays it in the ILEVIA Control app.
Scenario from a condition. The output of an IF (outside temperature below 5 °C) goes to the On / Off input of an "Anti-freeze" Scenario.