
Custom widget
How to use the Custom widget component in Ilevia Manager to graphically display (SVG and JavaScript) the status of multiple parameters, for example those of a hotel room.
Introduction
You are working on a hotel project and the customer asks to display the status of many rooms: this is possible, but the result would be graphical chaos. With the Custom Widget component, you can create graphic elements that represent the status of multiple parameters; for example, you can create a graphic element that represents all the information for each individual room. In this way, the customer can monitor the status of hundreds of rooms on the same screen. This graphic element can be created with a file editor such as Adobe Illustrator.
Each Custom widget represents a room and changes state when a parameter changes. In fact, each widget has a script that allows its graphics to be manipulated based on the parameters of the actual devices.
Use cases
The user can build a “responsive” room map, where they can check the status of parameters such as the temperature setpoint or the status of a light in a specific room.
A B&B owner can use this component to have complete, real-time control of each individual room and know whether it is occupied or not.
Reminder before continuing:
Download and install the Ilevia Logic plugin to enable plugins (link);
After uploading the Ilevia project to the server, wait a couple of minutes for the logic to start.
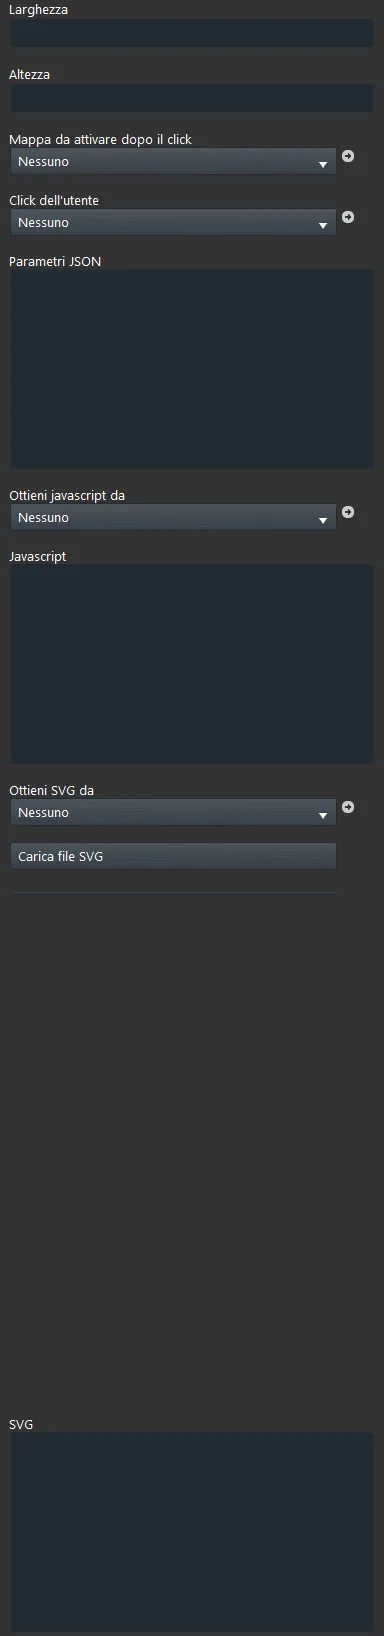
Component properties
Width: in this text field you can set the width applied to the image in the user interface.
Height: in this text field you can set the height that the image will have in the user interface.
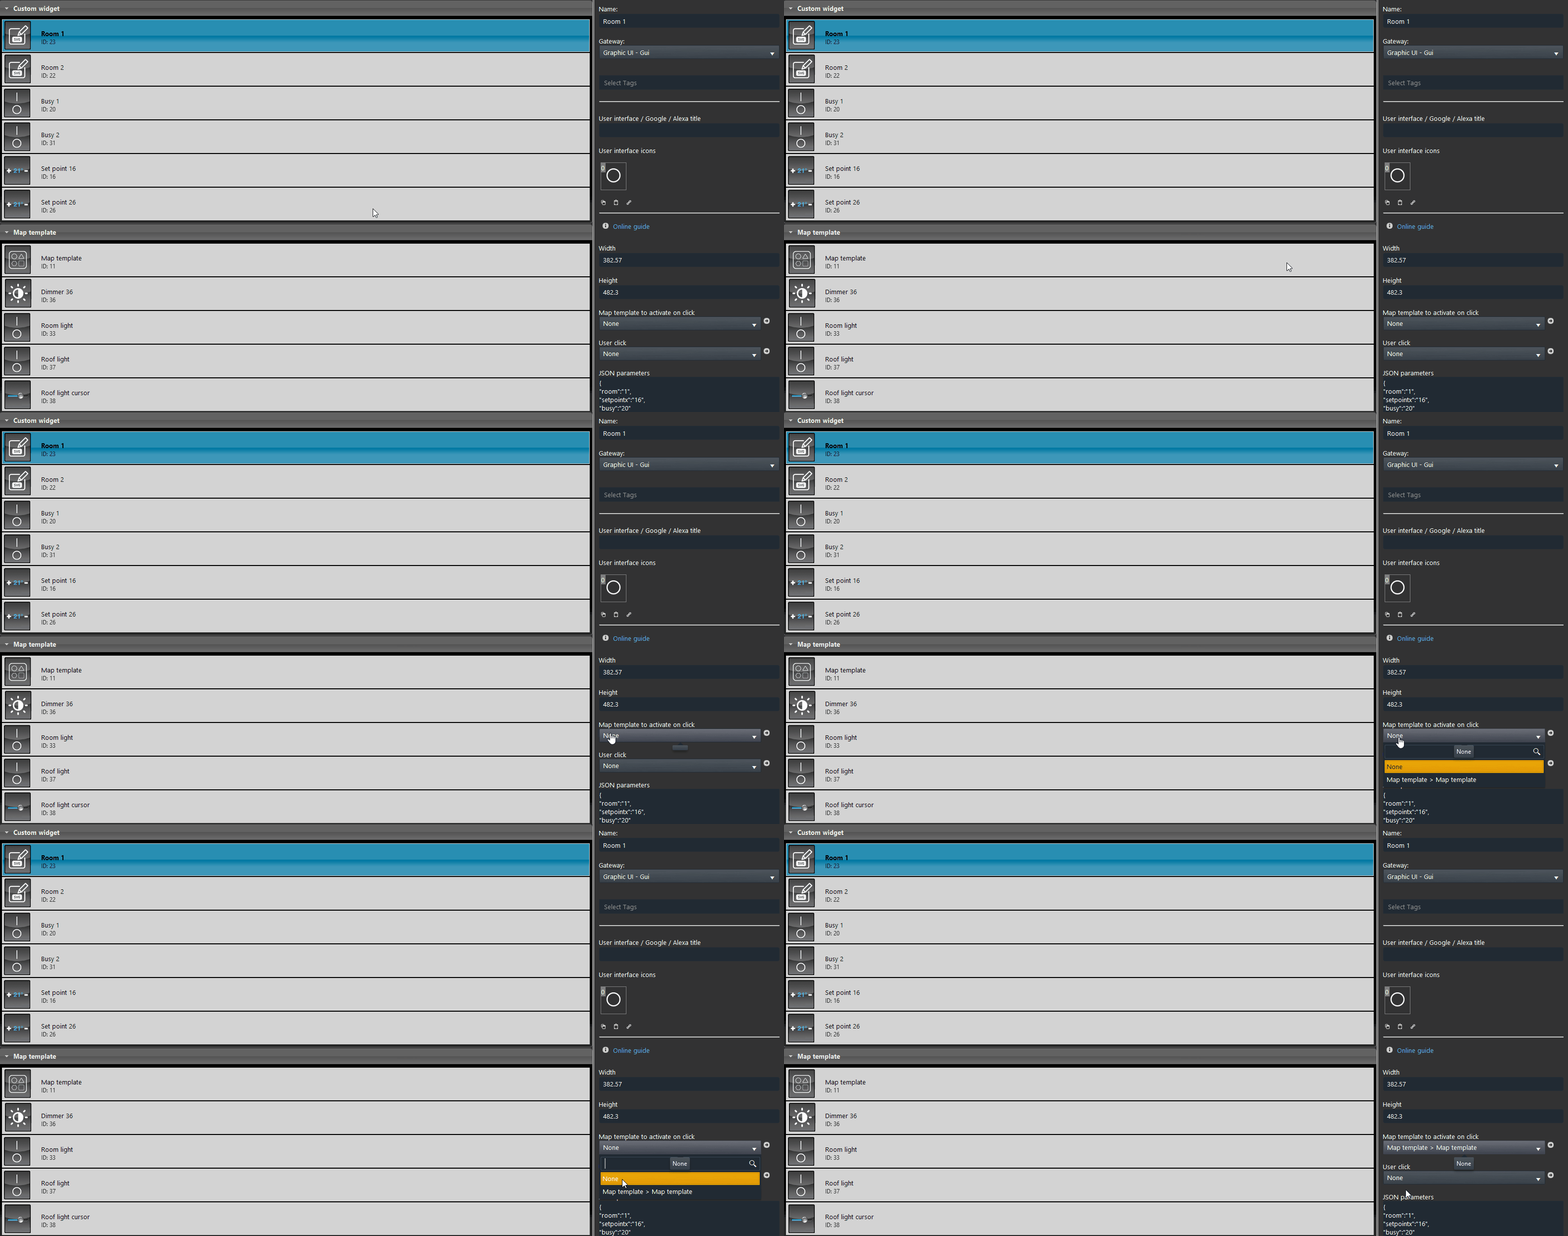
Map template to activate after click: this drop-down menu lets you choose a Map template from the existing ones, which will open when the user clicks this Custom widget in the user interface.
User click: in this field you can set a component which, once clicked, will open a map through the Map template component, where all devices configured within that room can be viewed.
JSON parameters: in this text field you can write a JSON string; for example, you can create a dynamic field in the SVG file that updates automatically when the component is added to the user interface, such as the hotel room number.
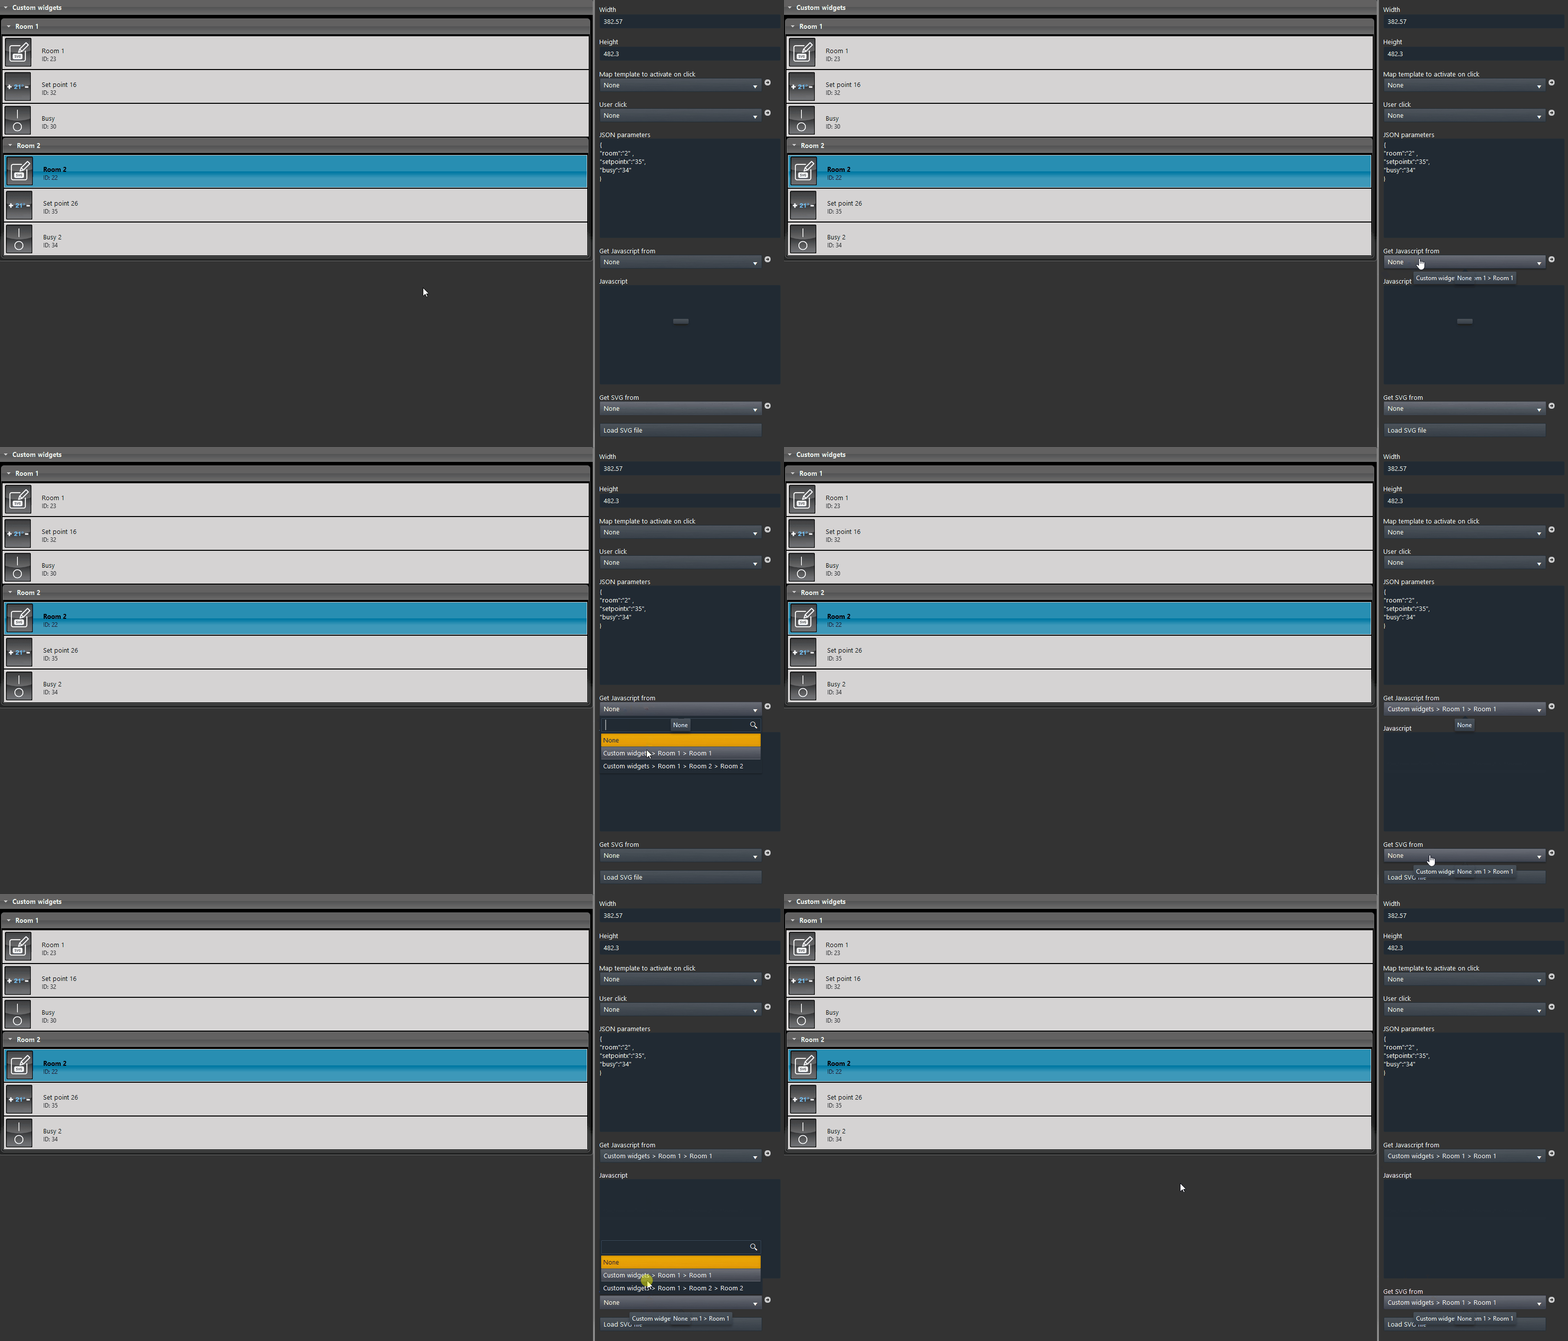
Get javascript from: this options list lets you select a JavaScript code source from other Custom widget components in the same project, useful if you have multiple Custom widgets in the project.
javascript: this text field lets you import the JavaScript that interacts with the SVG file when values change in the user interface.
Get svg from: this options list lets you link the SVG code from another existing Custom widget component in the project.
Upload SVG file: this button lets you upload an SVG element directly from a local file.
How to import the SVG file into the Custom widget component
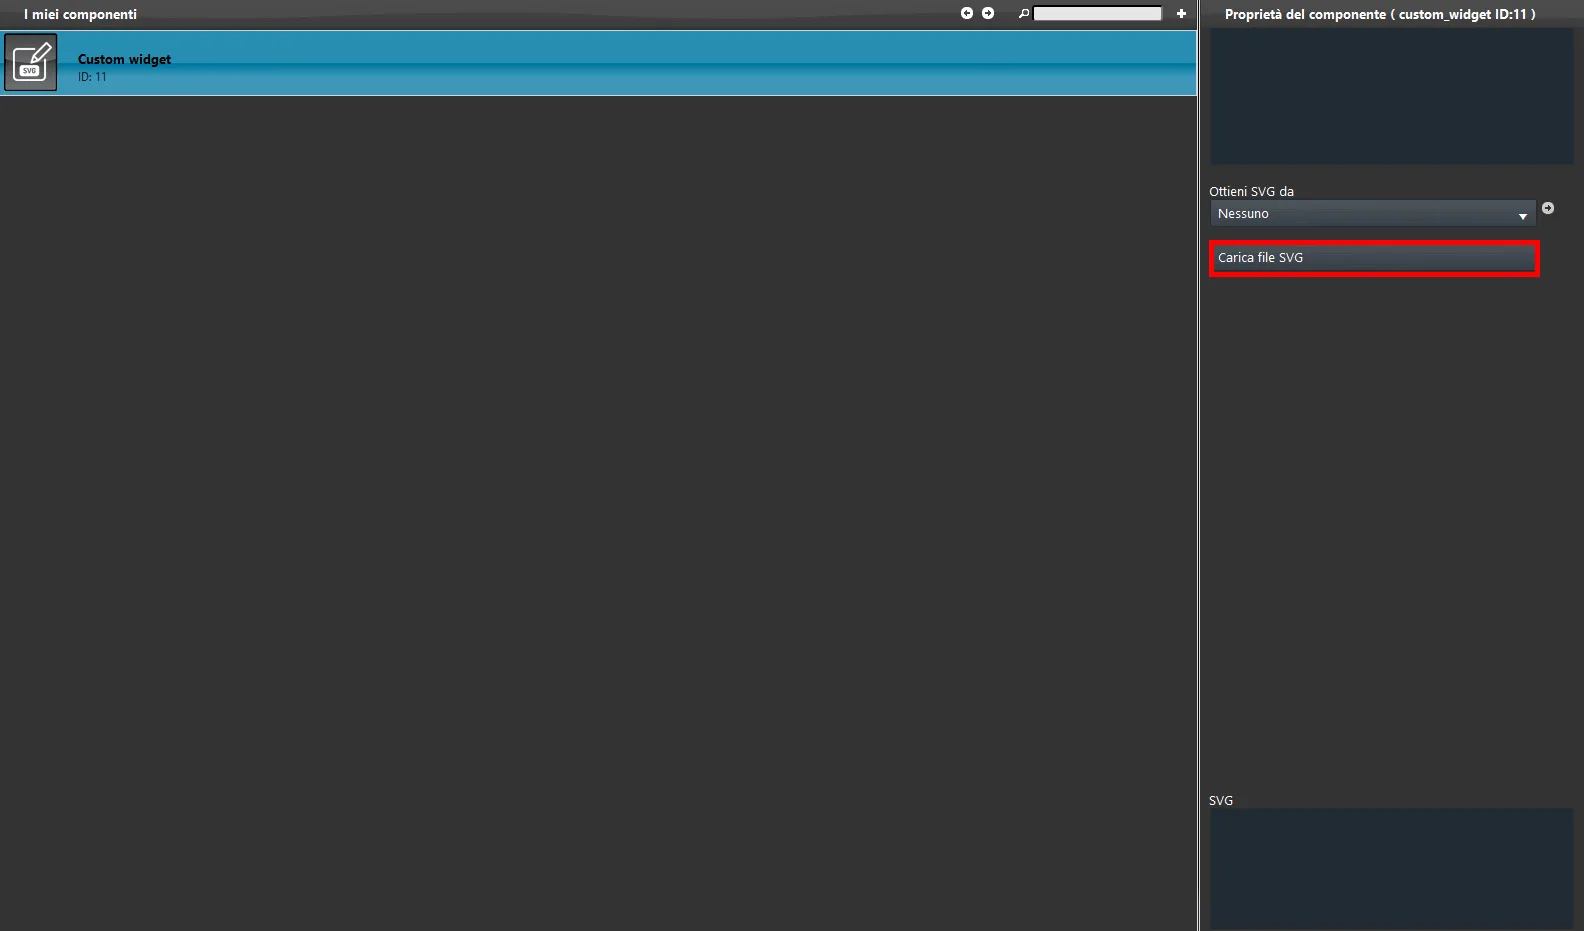
Step 1:
This component lets you select an SVG file directly from local files. Click the Upload SVG file button in the Custom widget component properties, then select the file and click Open.
JavaScript configuration
Step 2:
The Custom widget component needs a script to link the components of the Ilevia Manager project, such as Info, Setpoint, Options lists, Switches, etc., and to allow the display of current and changing values in the SVG file of the user interface.
To link the SVG file to the component in the project, you need to create a dedicated JavaScript script. This script must be modified according to the SVG file, its purpose and its structure. Another page describes in detail how to build and structure it: click here to see the script configuration.
How to set up a Custom SVG component with the same JavaScript but different JSON
You need to create specific parameters to apply to the Custom widget components in the user interface. By following the example shown below, you can set them correctly: the procedure consists of adding a JSON string from which the component takes the data.
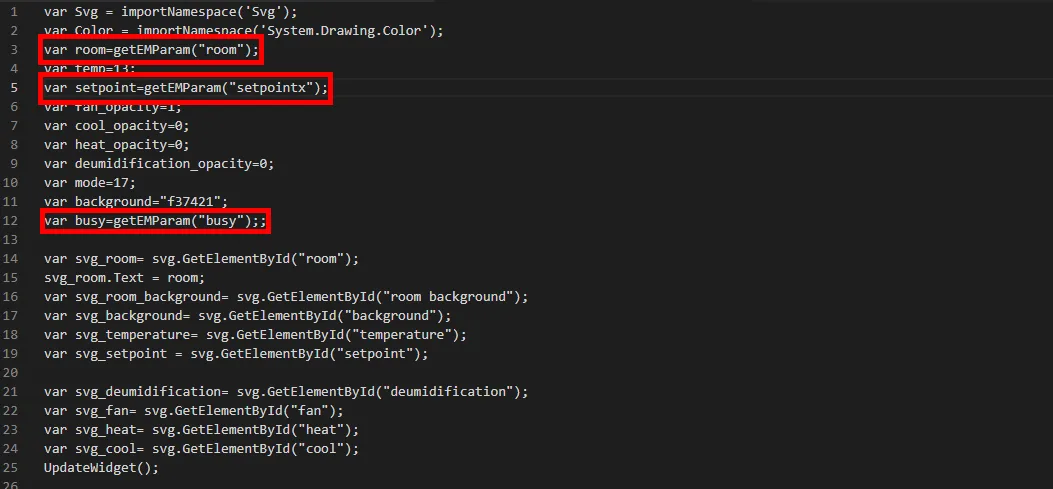
Step 3:
To set the JSON in the Custom widget component, you must define the variables that take their values from the data set in the component's JSON.
Variable setup: var Variable_name=getEMParam("JSON_parameter_name");
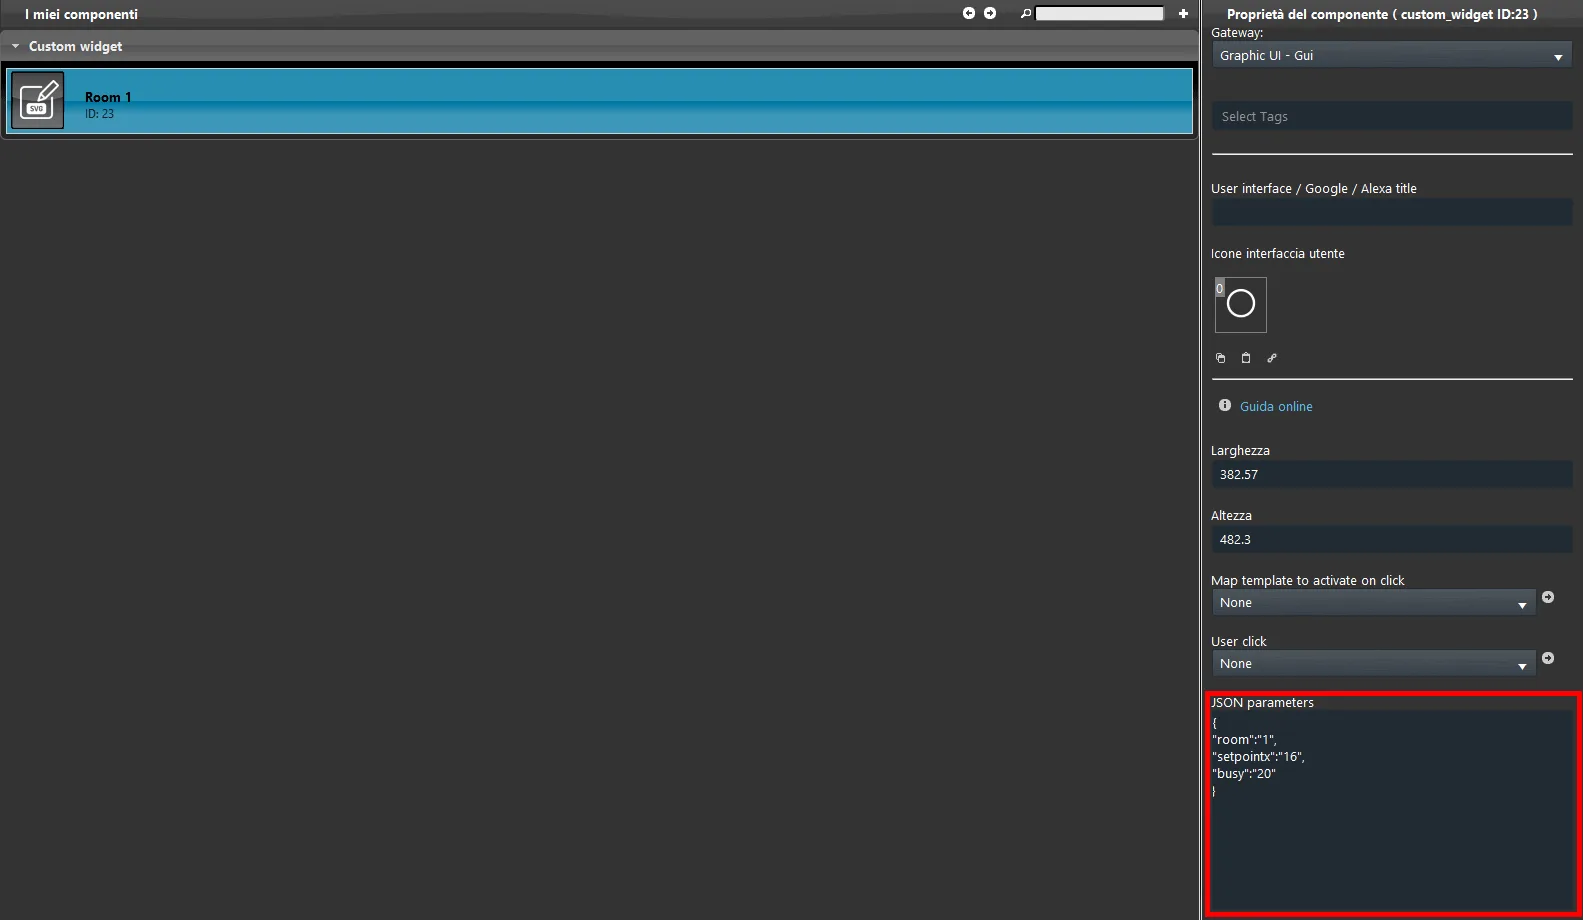
Step 4:
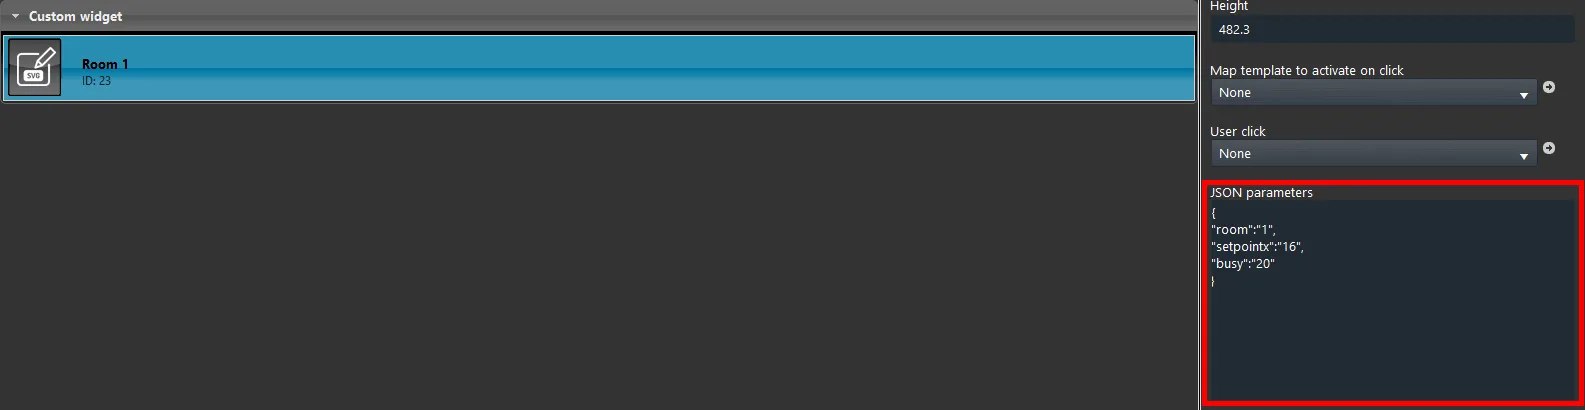
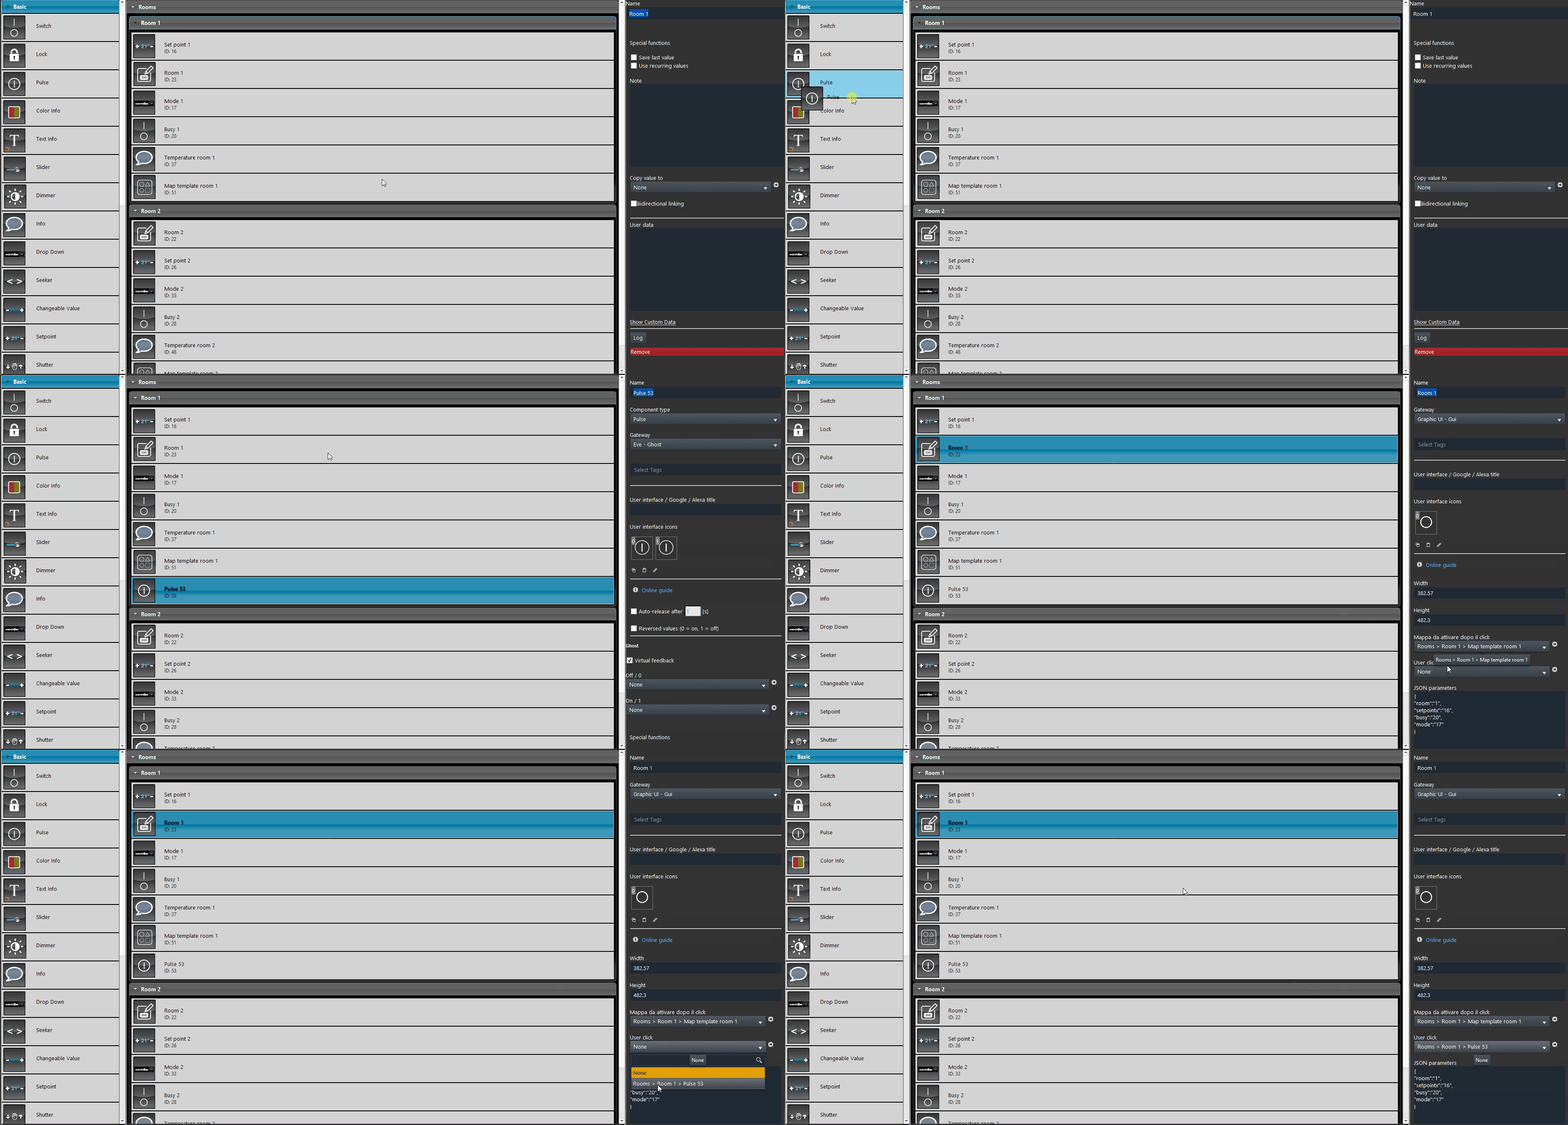
After setting the variables in the JavaScript code, you must specify them in the Ilevia project. Go to the Custom widget component properties: as you can see in the image below, in the JSON setup window we specified the room number, the Setpoint component, and the component that determines room occupancy.
Step 5:
If you have more than one Custom widget component in the same project, you can connect JavaScript scripts and SVG files from other Custom widget components already present in the current Ilevia Manager project.
Step 6:
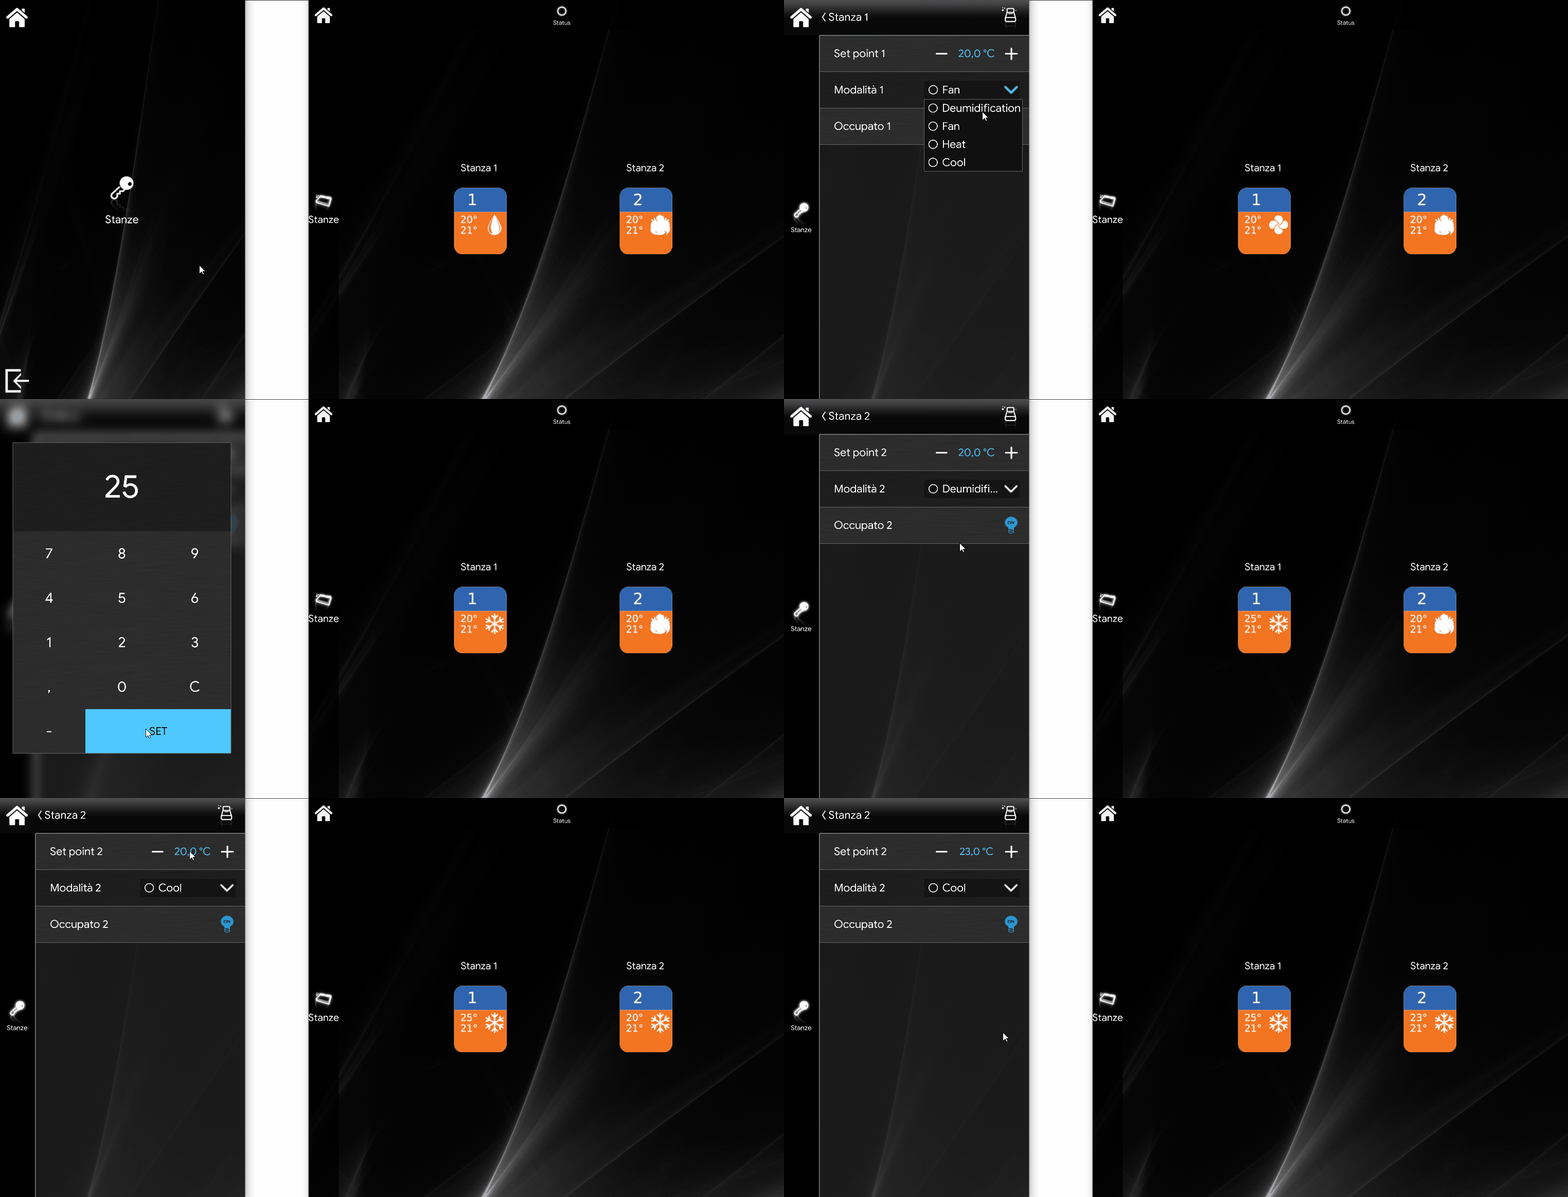
The figure below shows the visual result created by the settings defined in the project; it is just one of the many possibilities achievable with the Custom widget component.
How to connect the Map template component to the Custom widget
The Custom Widget component allows you to connect a Map template component in its settings: clicking the Custom widget in the user interface will open a map.
From the Custom widget component properties, choose the Map template you want to show when the Custom widget is clicked in the Ilevia Control app user interface.
How to open a Map template by clicking a Custom widget
To open the Map template component, a trigger component is required which, once pressed in the user interface, opens the Map template selected in the Custom widget component drop-down menu.
Then add a Button component to the project and select it in the Custom widget component properties.
Developing JavaScript functions with the Custom widget
Introduction
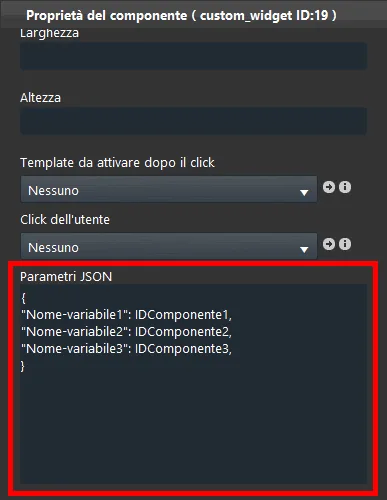
Since the Custom widget component has its own JavaScript development field, you can create your own code, reusable multiple times without interfering with the other ones present in the Ilevia Manager project. In the “JSON Parameters” text field, enter the names and IDs of the components in the format shown below.
Add the variables in the JSON Parameters text field as shown below:
{"Variable-name1": ComponentID1, "Variable-name2": ComponentID2, "Variable-name3": ComponentID3, etc.}
You can add as many Custom Widgets as you need: they can all contain the same code and the same variable names.
Below you will find practical examples that explain step by step how to configure JavaScript functions with the Custom Widget component: