
Integration of Shelly Door Window 2 with Ilevia via MQTT
How to configure the Shelly Door Window 2 sensor via MQTT in Ilevia Manager: state, brightness, battery, tilt, temperature, and vibration.
Introduction
This Shelly device is designed to be applied to doors and windows and provides the following values: whether they are open, closed, or tilted (with a specific angle in degrees), the room temperature where the device is installed, room brightness, battery level, and whether the device detects vibrations when the window is closed.
Web interface configuration
Step 1:
First, connect to the Shelly Door Window 2 device Wi-Fi network. Once connected, enter the default IP address for accessing the Shelly device web interface in the URL bar: 192.168.33.1.

Step 2:
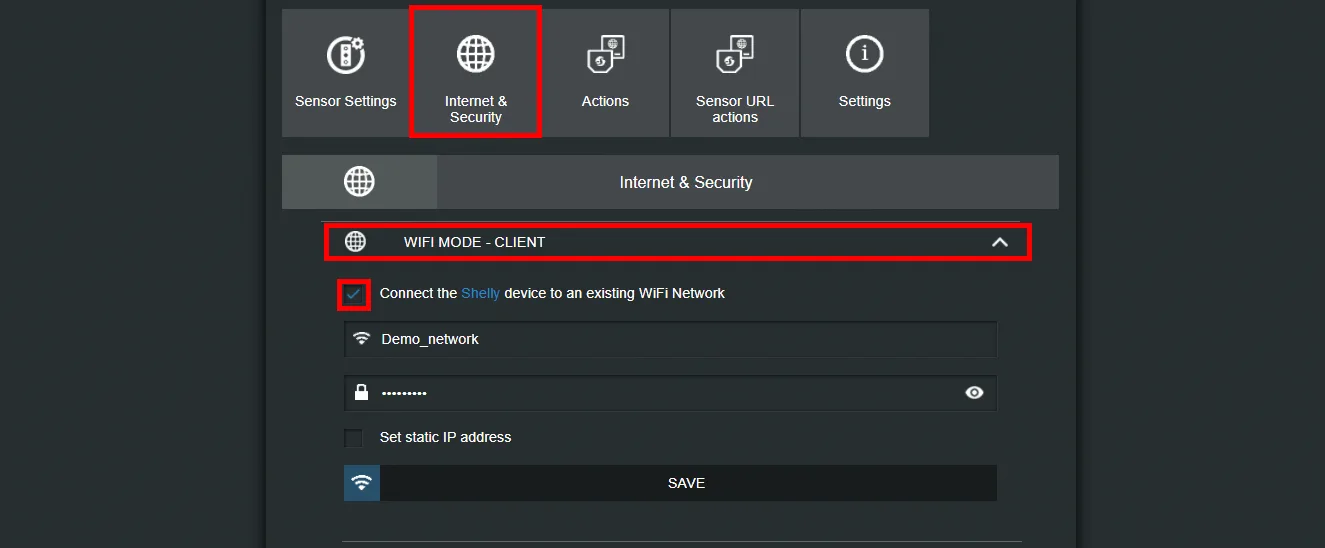
Go to the Internet security settings menu, open the wifi client mode section, and select the Connect the device to an existing wifi network checkbox to connect the Shelly device to your local network.
Step 3:
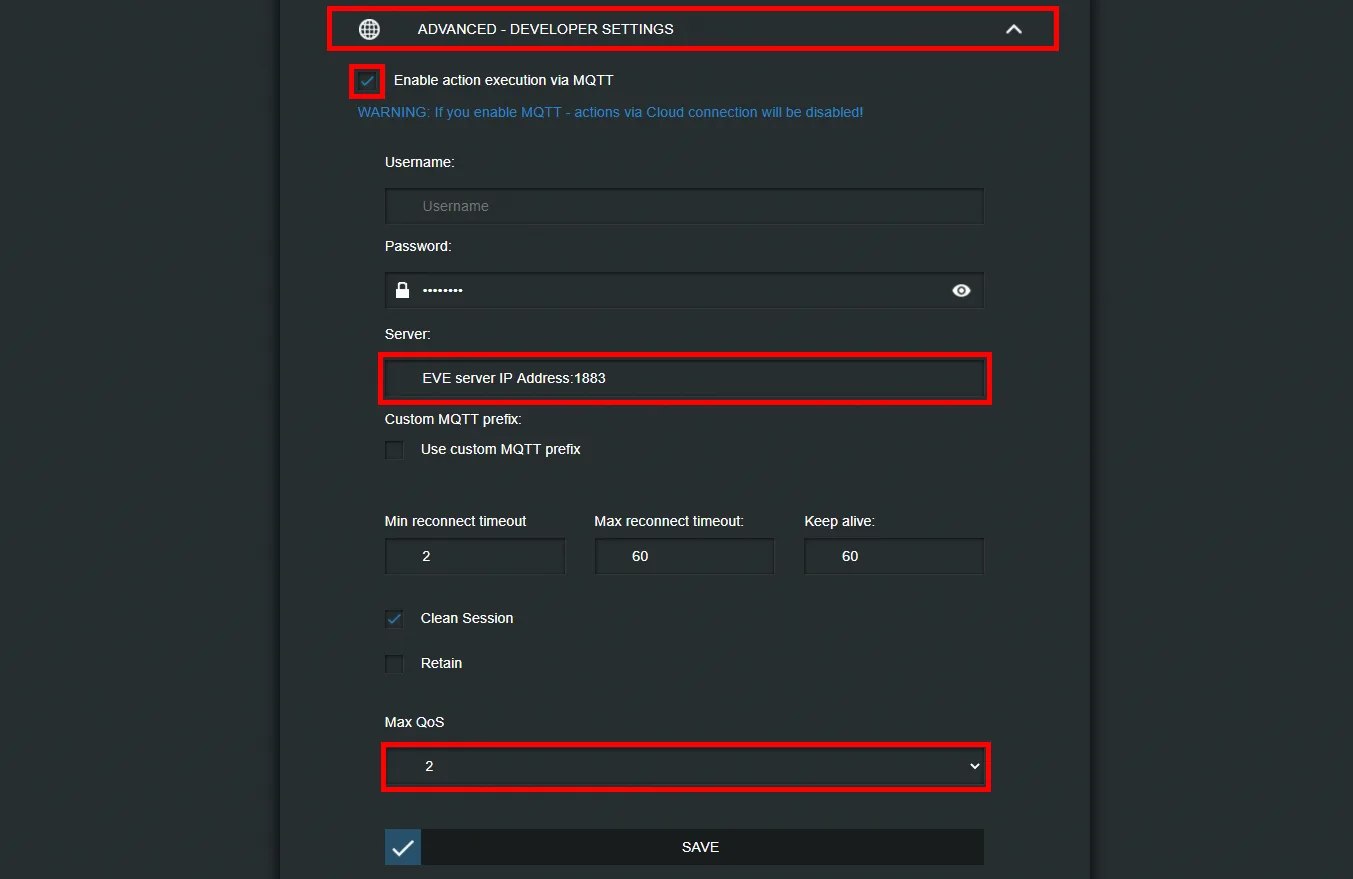
The next step is to enable actions via the MQTT protocol on the Shelly device: in the Internet security settings menu, open the Advanced developer settings section and enable the Enable action execution via MQTT protocol checkbox.
Enter your IP address of your Ilevia server in the Address text field of the MQTT protocol settings, then set QoS to 2 and finally click SAVE to apply the settings.
Topic configuration
This is the list of topics used in the guide:
Topic configuration index
– shellies/shellydw2-<deviceID>/sensor/state: this topic reports the current door/window state;
– shellies/shellydw2-<deviceID>/sensor/lux: this topic reports the brightness level of the room where the device is located;
– shellies/shellydw2-<deviceID>/sensor/battery: this topic reports the device battery level;
– shellies/shellydw2-<deviceID>/sensor/tilt: this topic reports the window tilt angle, from 0 to 180;
– shellies/shellydw2-<deviceID>/sensor/temperature: this topic reports the current temperature of the room where the device is installed;
– shellies/shellydw2-<deviceID>/sensor/vibration: this topic reports 0 if no vibration is detected and 1 if it is detected.
Step 4:
Open Ilevia Manager, create a new project, and create a new MQTT gateway: this guide explains step by step how to set up the new MQTT gateway.
Step 5:
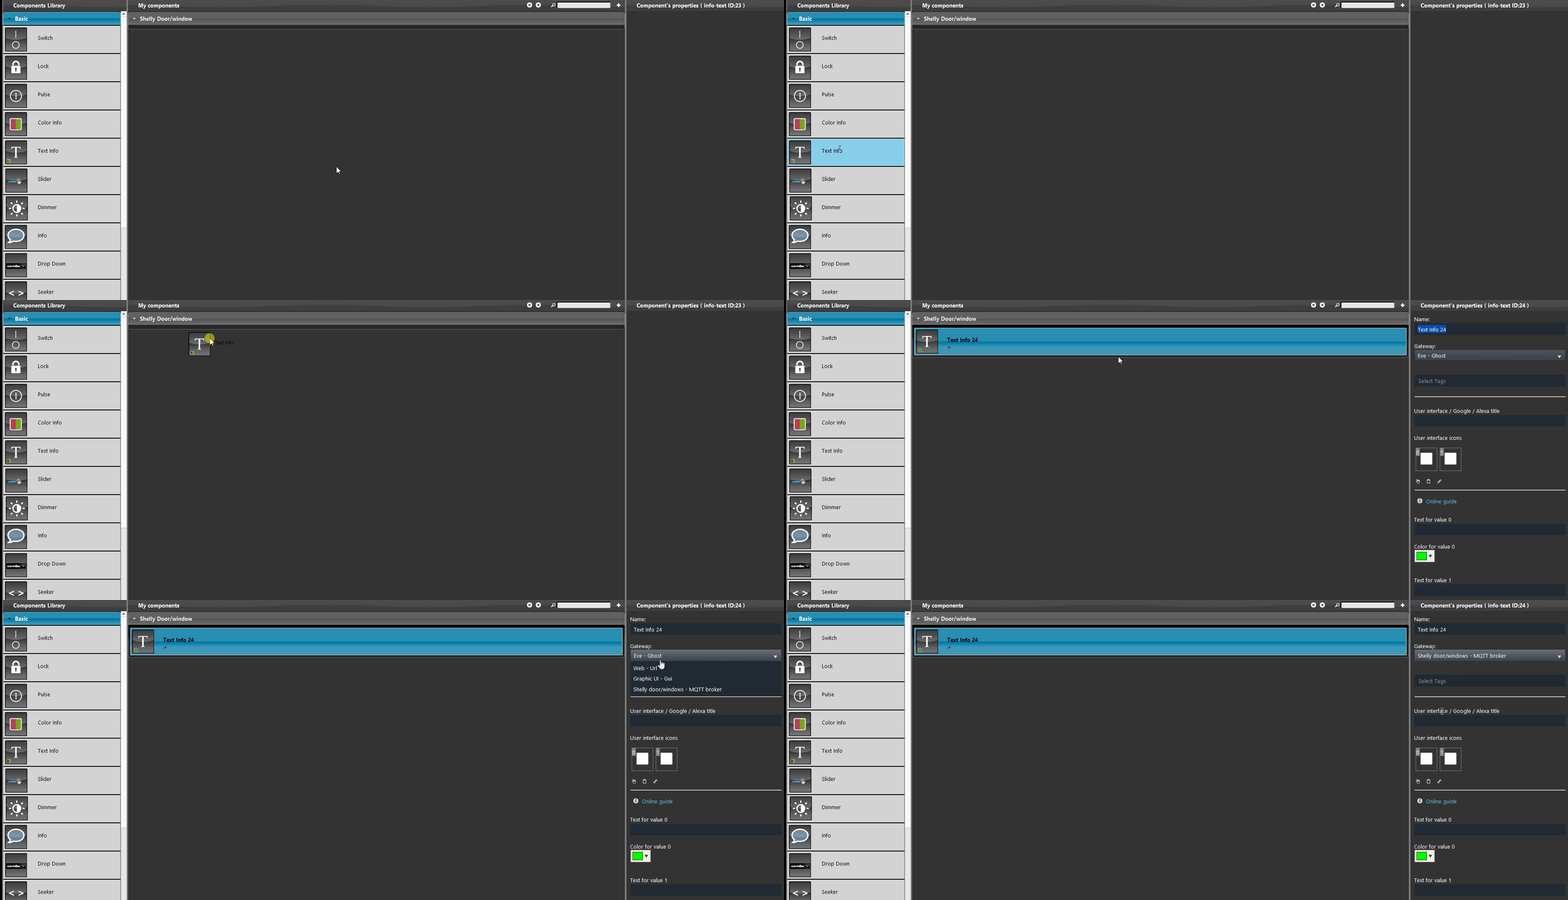
Now set up the first topic, which reports the door/window state (closed or open). Drag a Text Info component into the project and set its gateway to the previously created MQTT one.
Step 6:
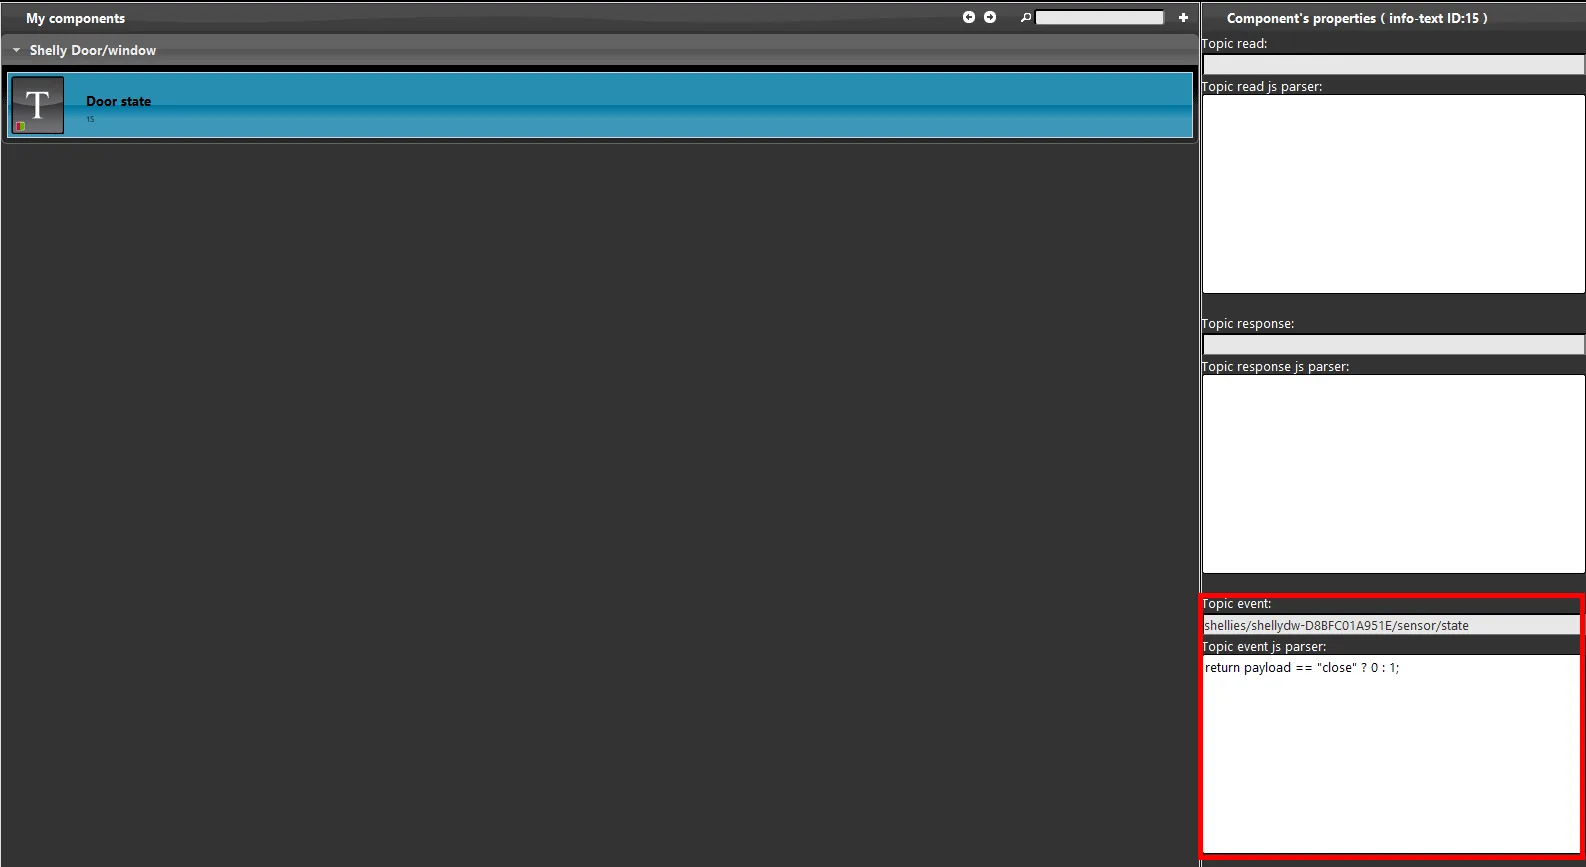
Topic: shellies/shellydw2-<deviceID>/sensor/state
Now configure the component. The topic that receives the device state is the Event topic.
Clicking this link you can view the topic configuration illustrated.
Step 7:
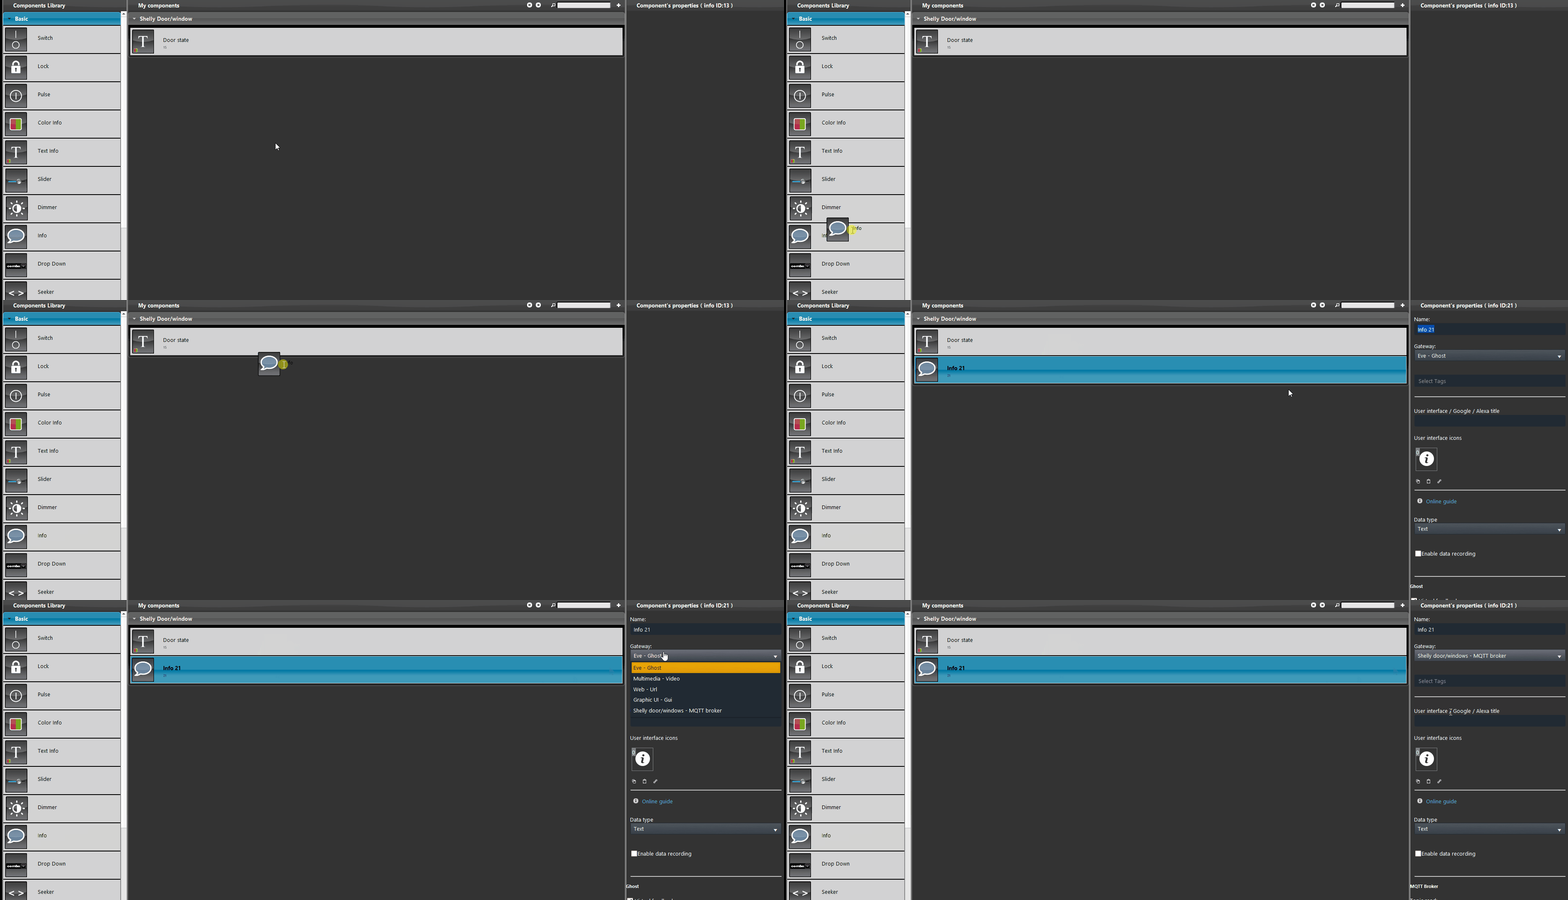
To receive the Lux value from the Shelly device, add a new Info component in the Ilevia Manager Components section and set the gateway to the previously created MQTT one.
Step 8:
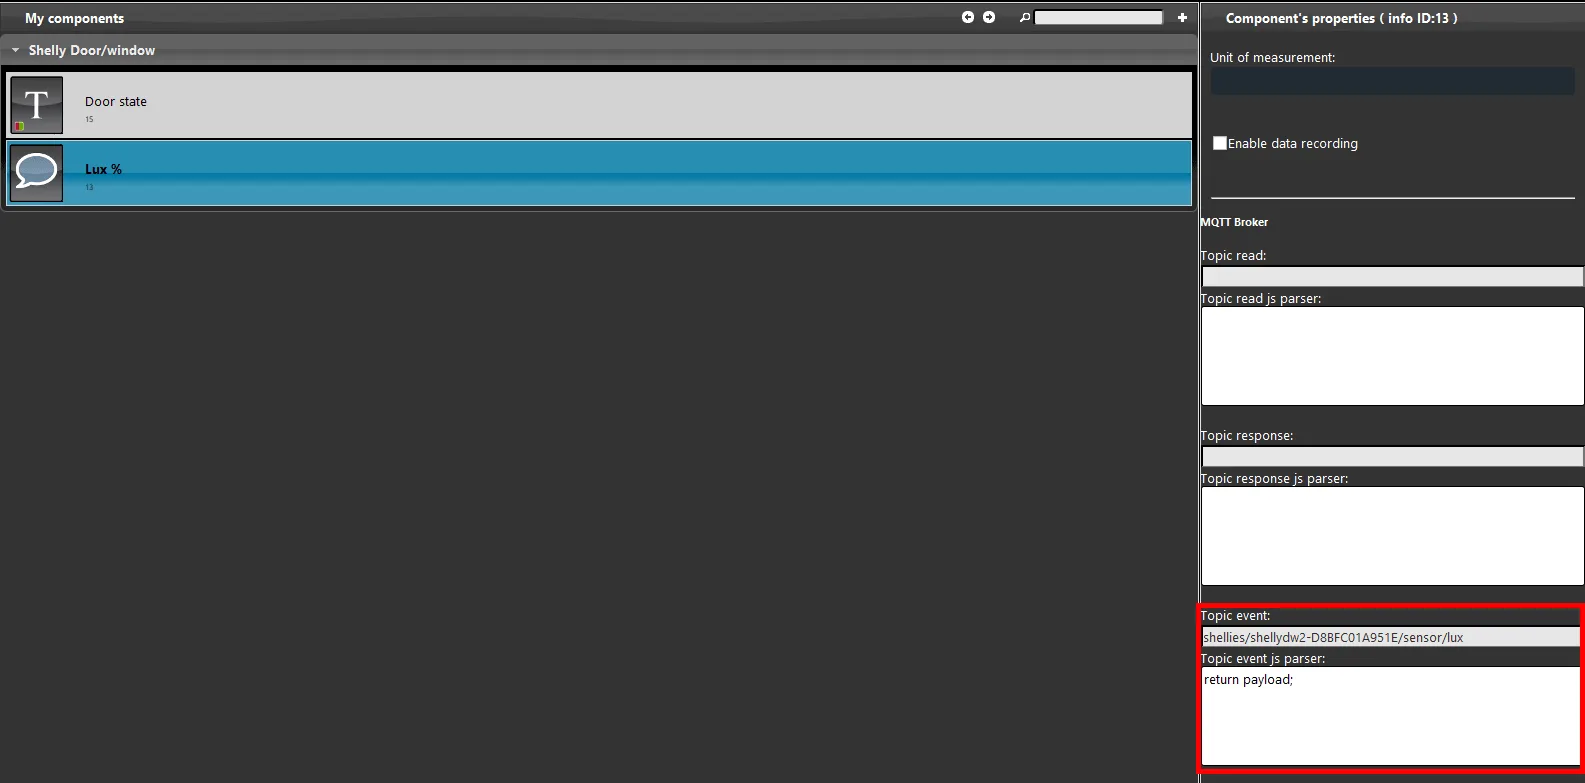
Topic: shellies/shellydw2-<deviceID>/sensor/lux
This is the topic to apply to the Info component to receive the value from the Shelly device.
Clicking this link you can view the topic illustrated in the image below.
Step 9:
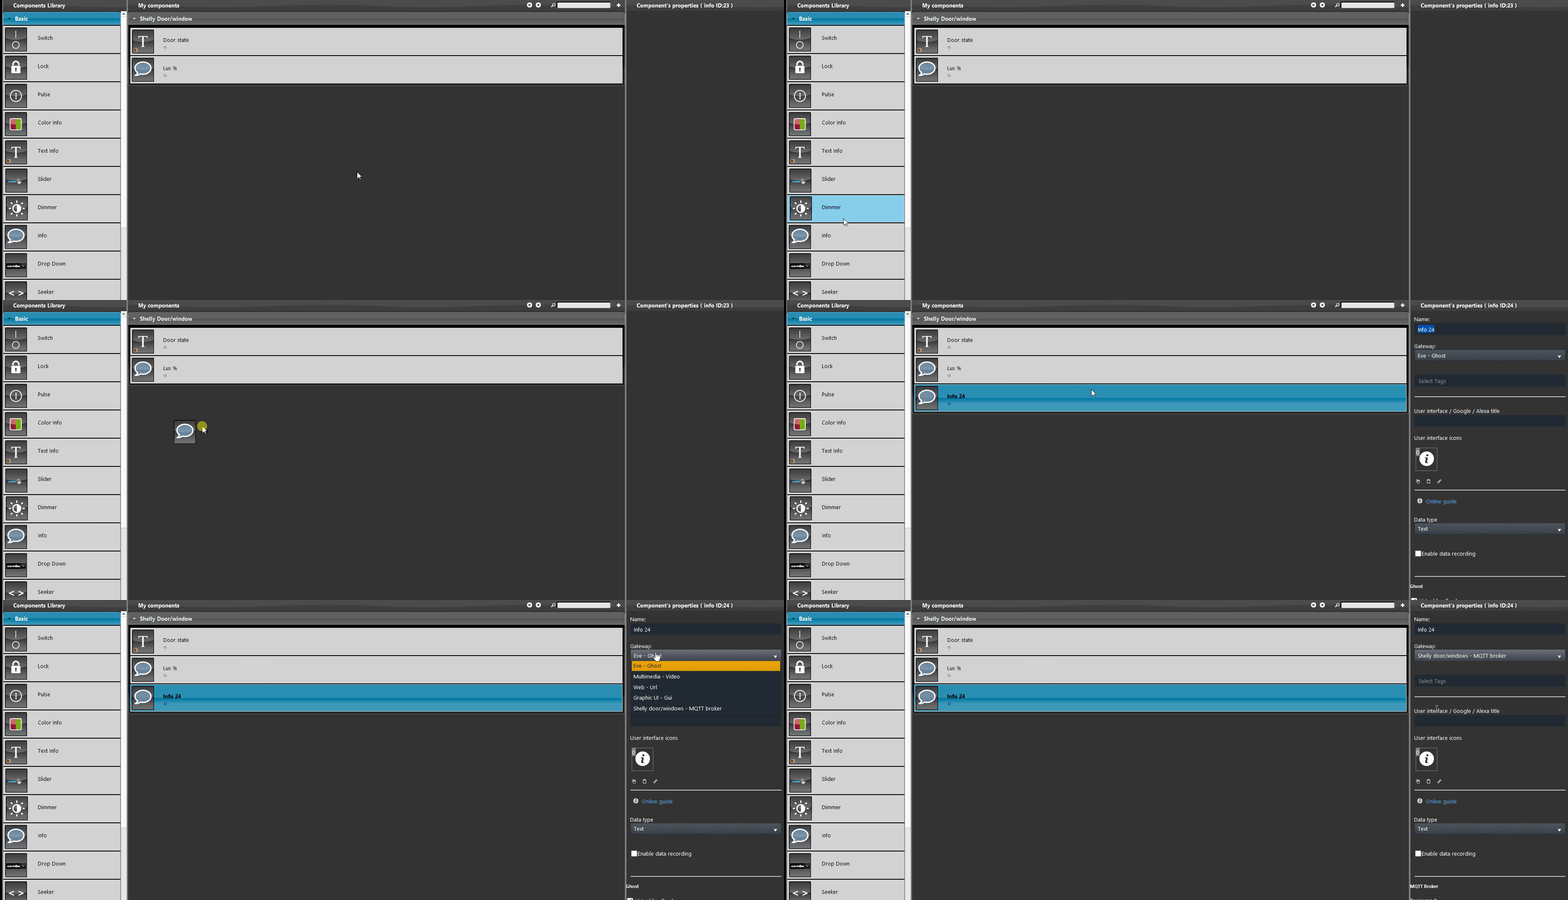
Now configure the Info component that reports the battery level of the Shelly device.
Then add a new component to the project and set the MQTT gateway.
Step 10:
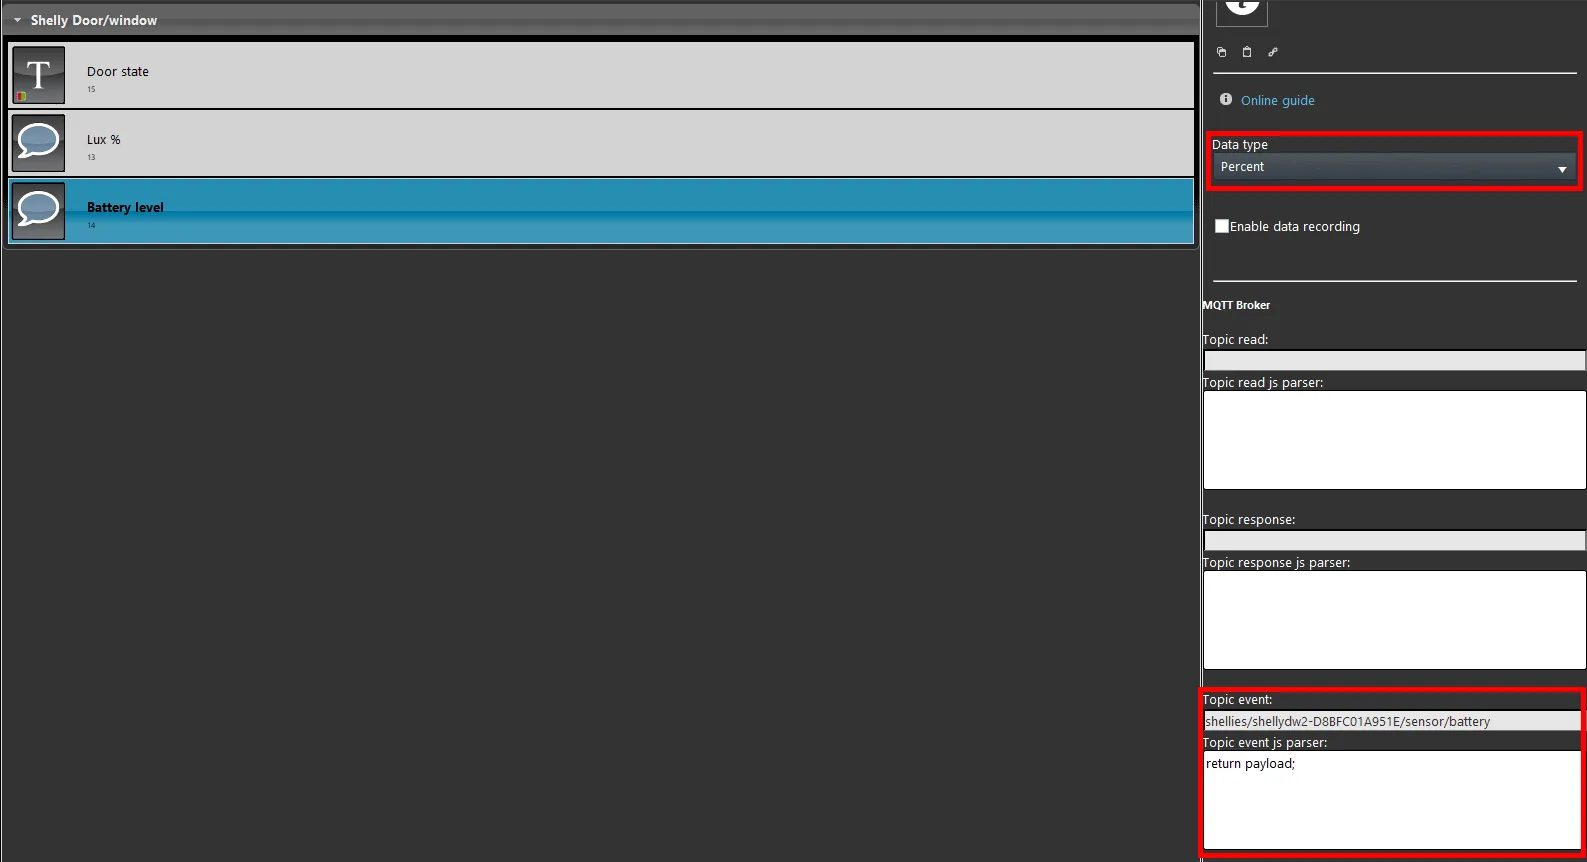
Topic: shellies/shellydw2-<deviceID>/sensor/battery
Set the topic that reports the battery level of the Shelly device. To display the value as a percentage, select “Percentage” as the unit of measure from the Data type options list in the component properties.
Clicking this link you can view the topic illustrated in the image below.
Step 11:
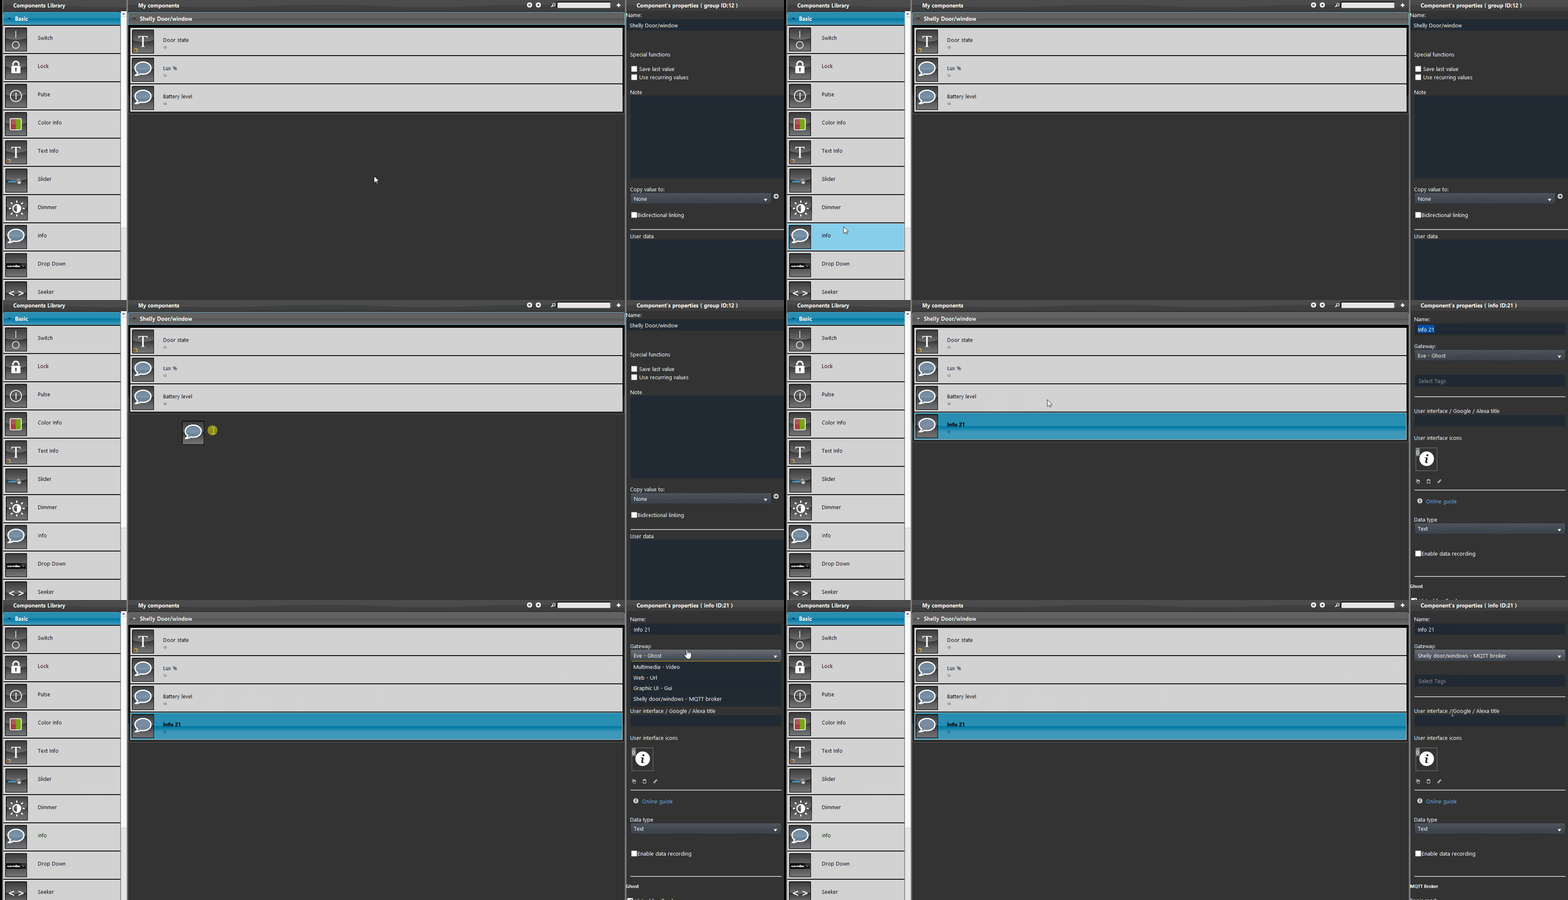
Let's configure the component that reports the window tilt value coming from the Shelly device. Add a new Info component to the project and set it to the MQTT protocol from the gateway options list in the component properties.
Step 12:
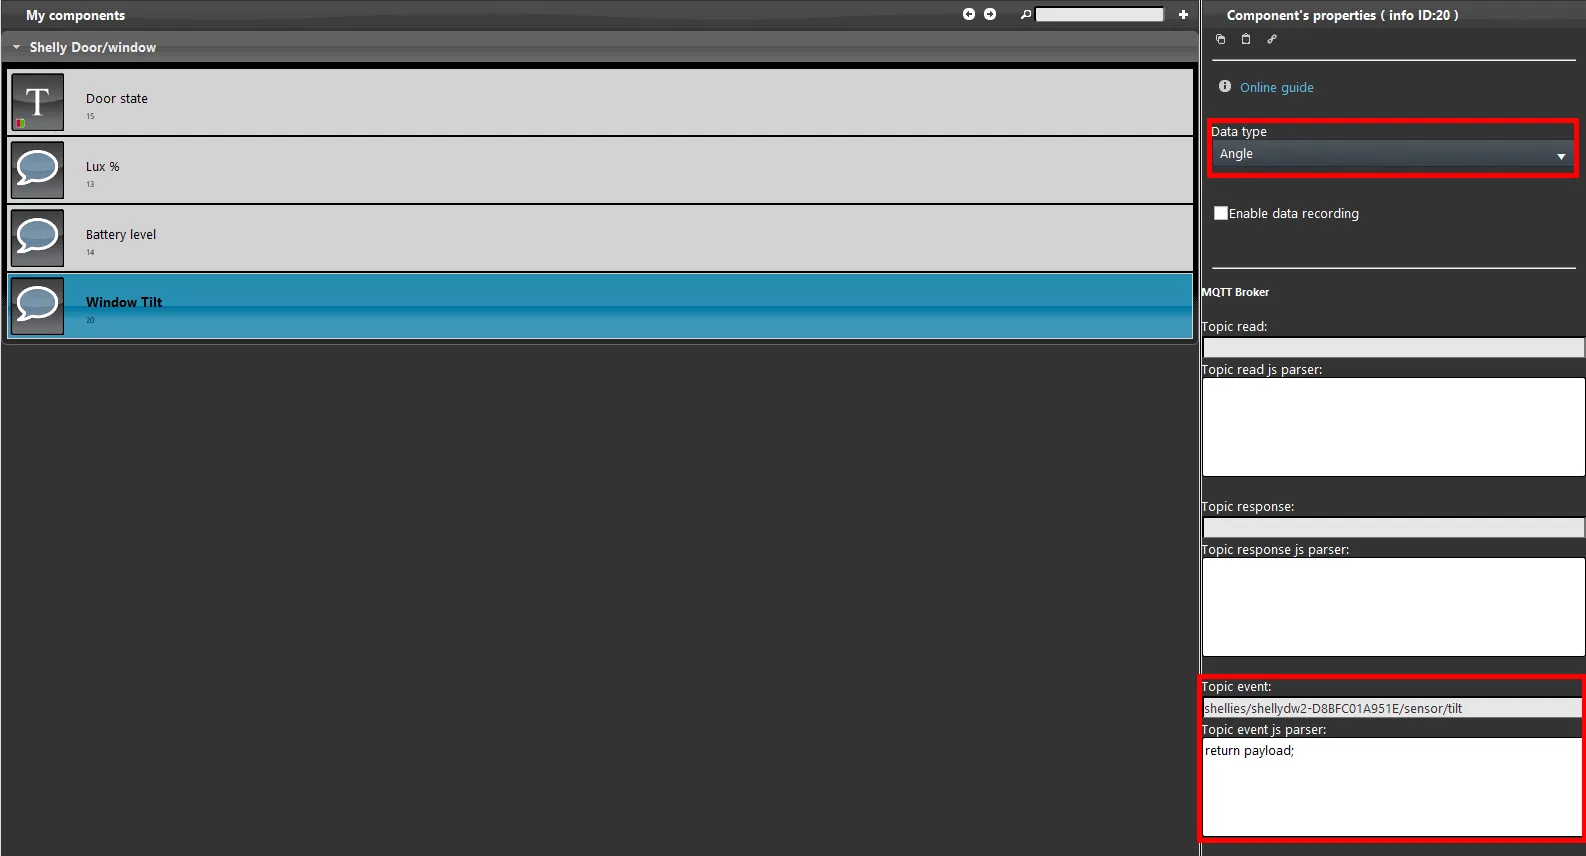
Topic: shellies/shellydw2-<deviceID>/sensor/tilt
Set the topic that reports the value published by the Shelly device. The value is an integer: to display it as “°”, select the unit of measure from the Data type options list in the component properties.
Clicking this link you can view the topics illustrated in the image below.
Step 13:
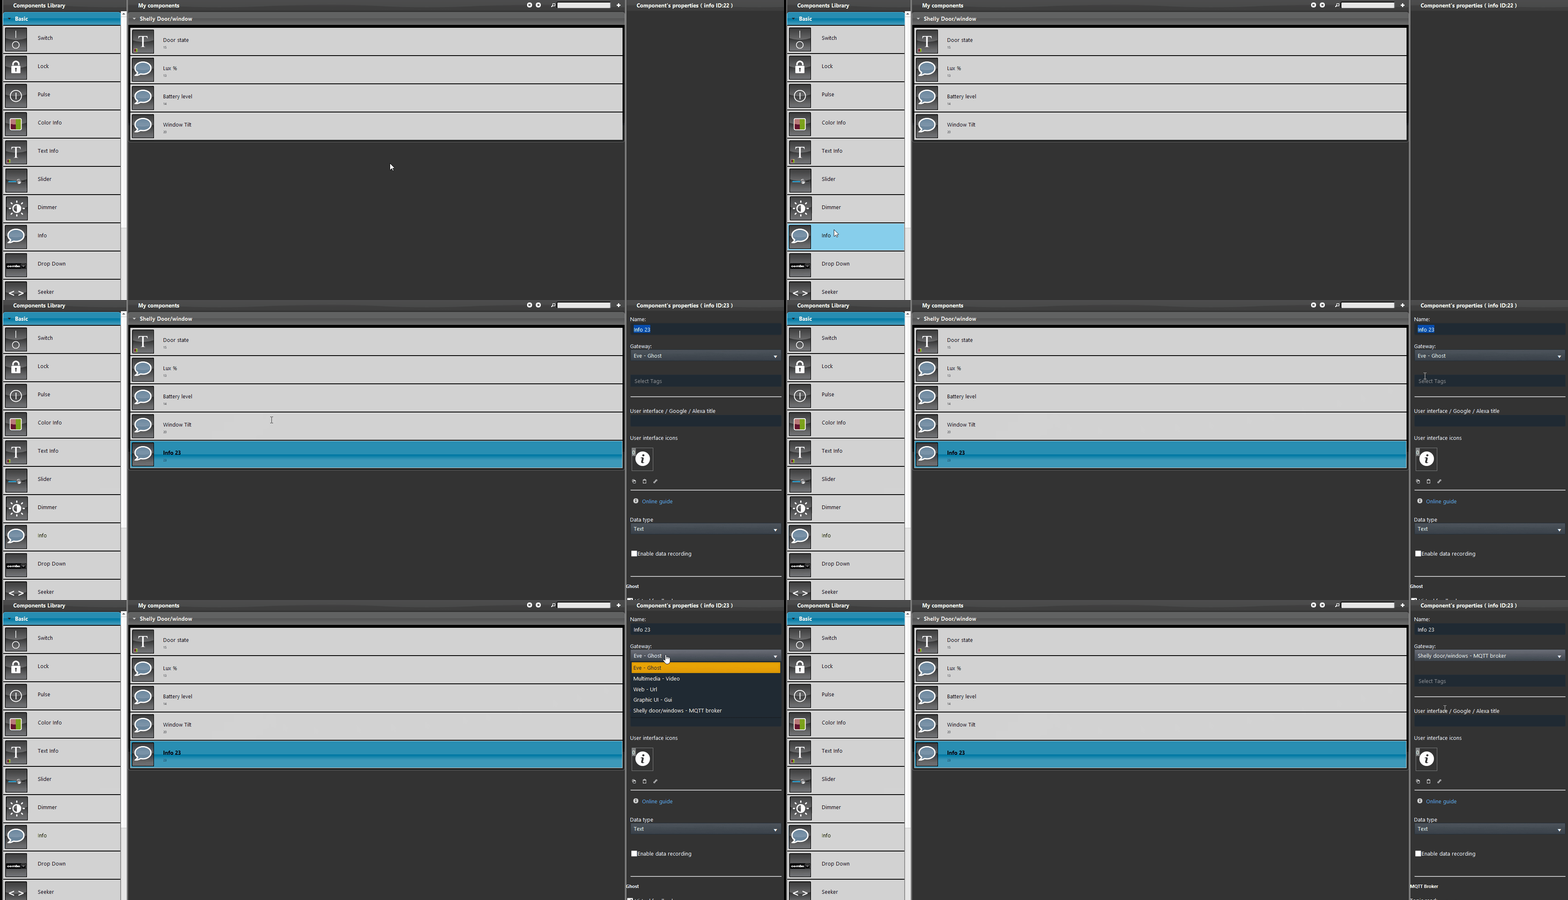
Let’s configure the component that displays the temperature published by the Shelly device. Add a new Info component to the project and set it to the MQTT protocol from the gateway options list, in the upper part of the component properties.
Step 14:
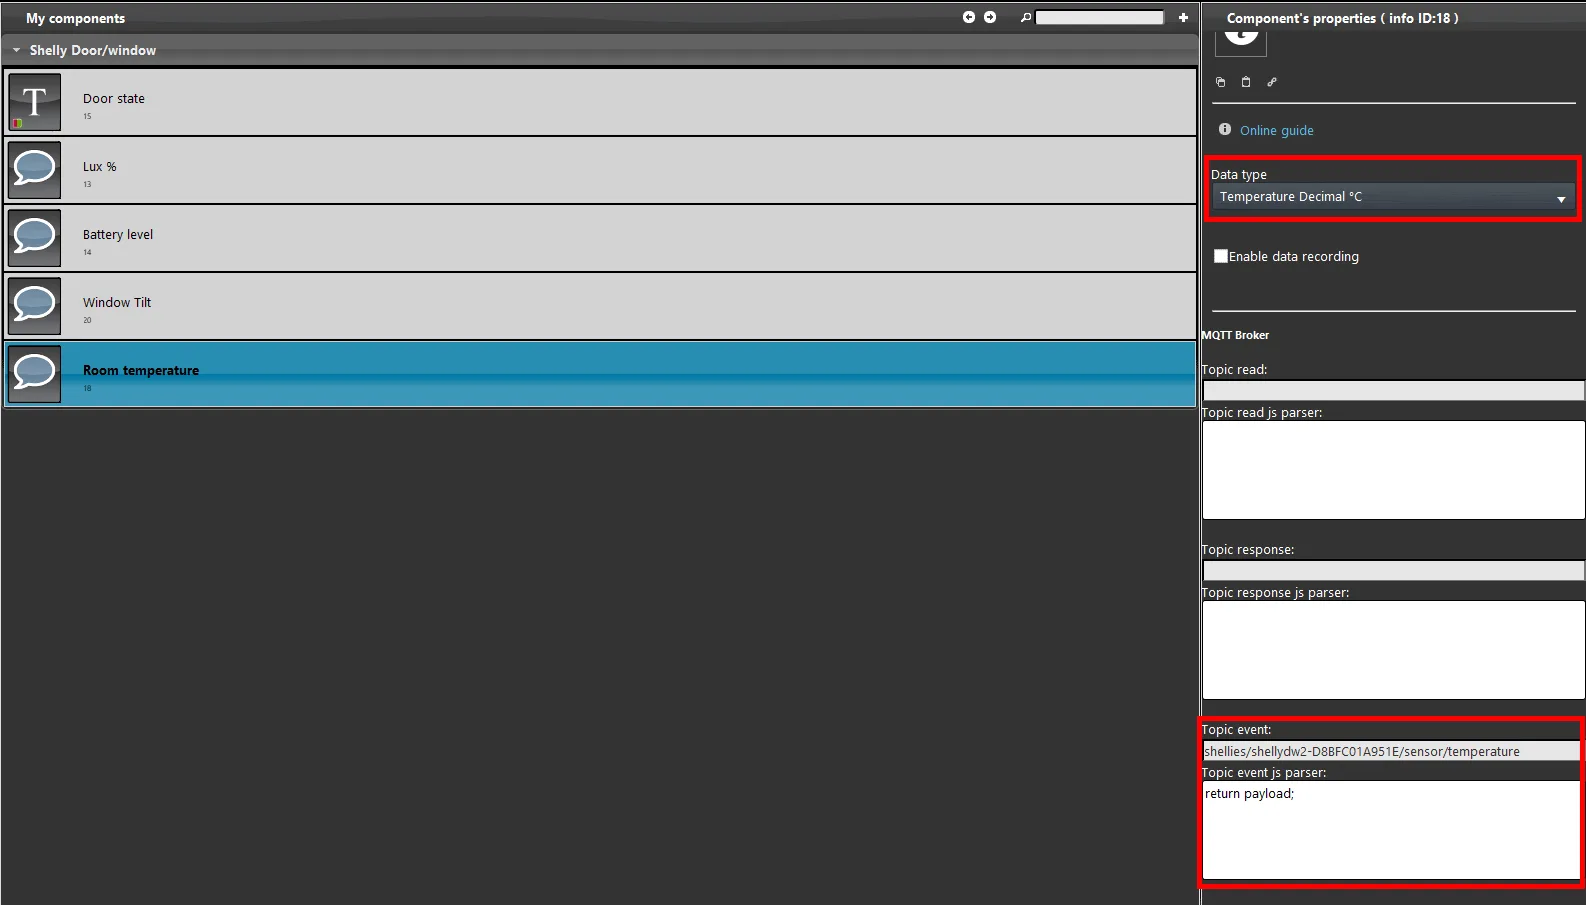
Topic: shellies/shellydw2-<deviceID>/sensor/temperature
Let’s set the topics. This topic returns the value published by the Shelly device as a decimal number.
By clicking this link you can view the topics shown in the image below.
Step 15:
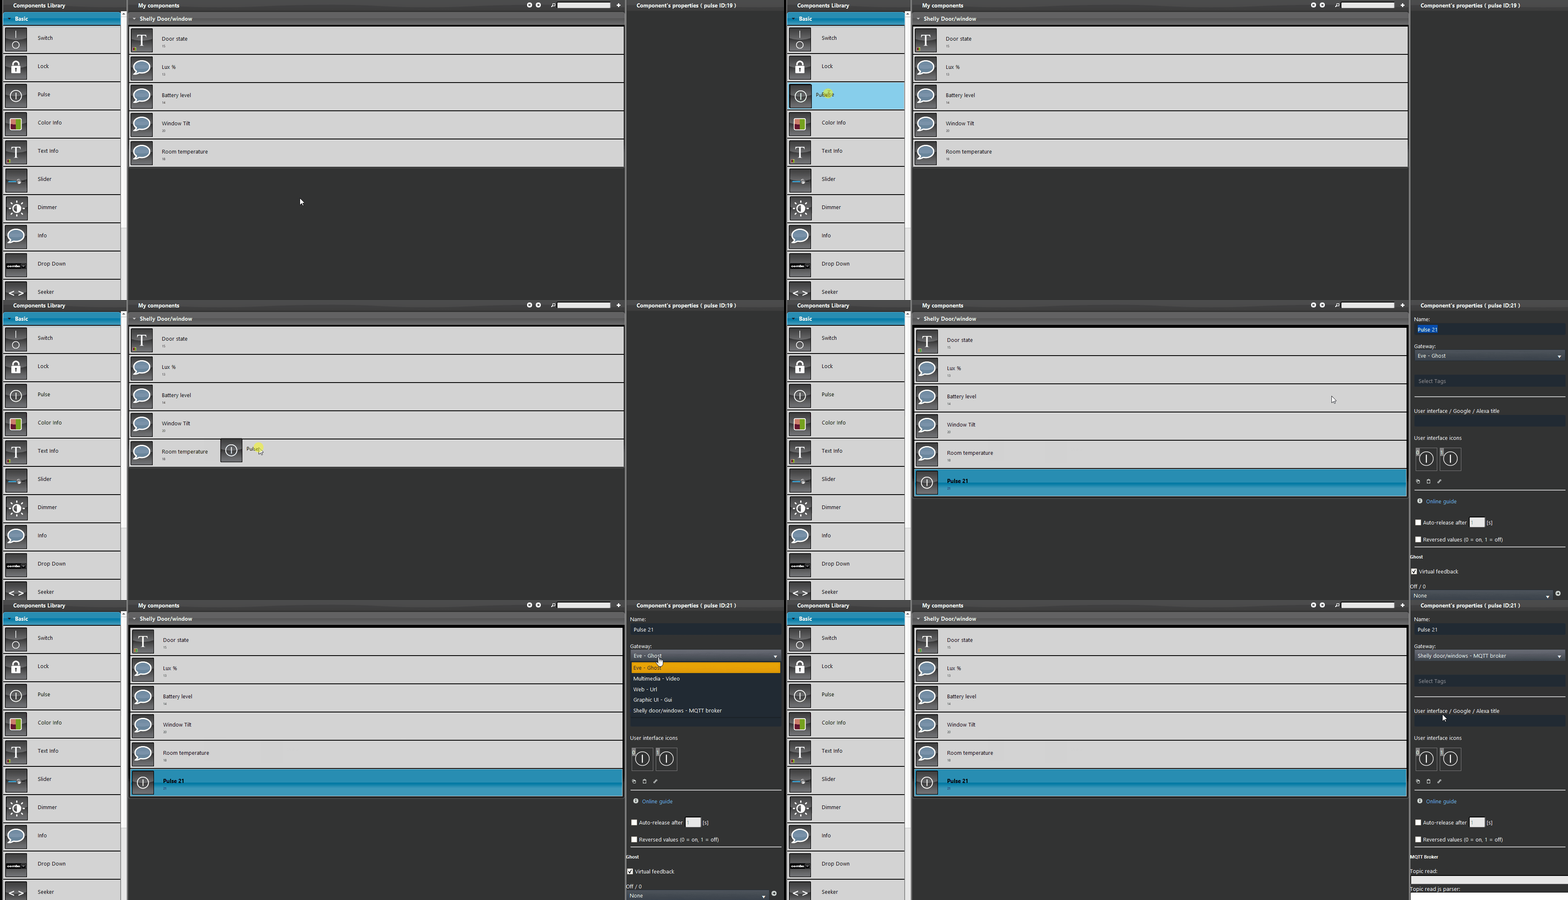
Finally, let’s configure vibration detection: add a new Button component in the Components section and set its protocol to the previously created MQTT, selecting it from the Gateway options list in the component properties.
Step 16:
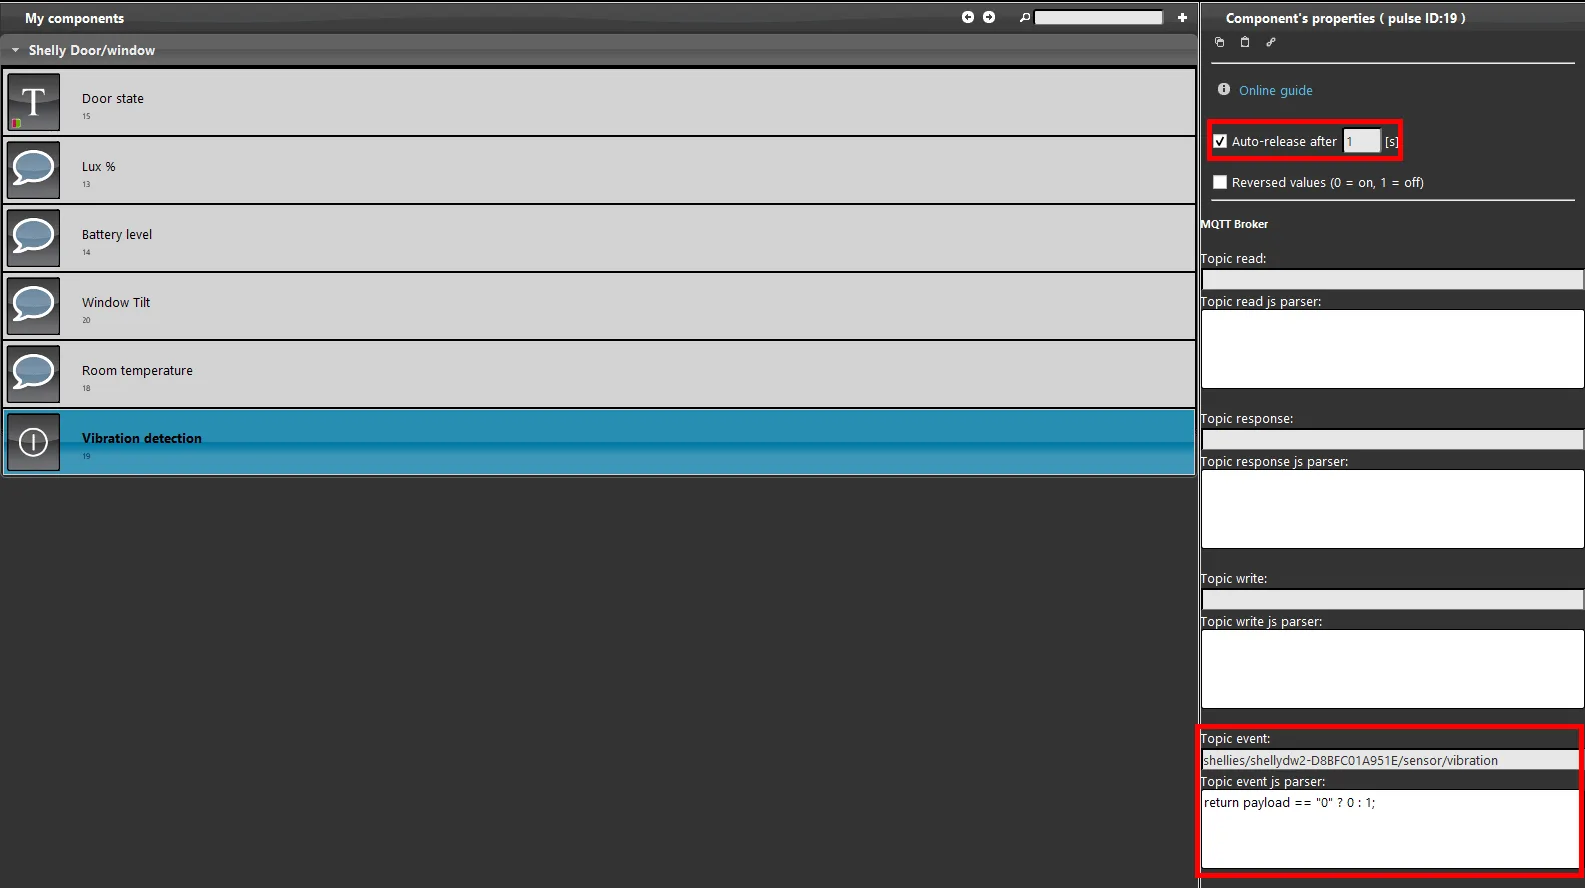
Topic: shellies/shellydw2-<deviceID>/sensor/vibration
Now let’s set the related topics: this time the topic does not only receive the state, but also changes the state of the Button component. To reset the Button component state every time the Shelly device triggers it, set a release time (“Auto release”) in the auto release section of the Button component properties; a release time of 1 second is recommended.
By clicking this link you can view the topics shown in the image below.
How to configure notification sending when vibration is detected
Introduction
If the option is enabled, the Shelly Door Window 2 device sends the value 0 if no vibration is detected and 1 if vibration is detected.
Notifications module setup
Step 1.1:
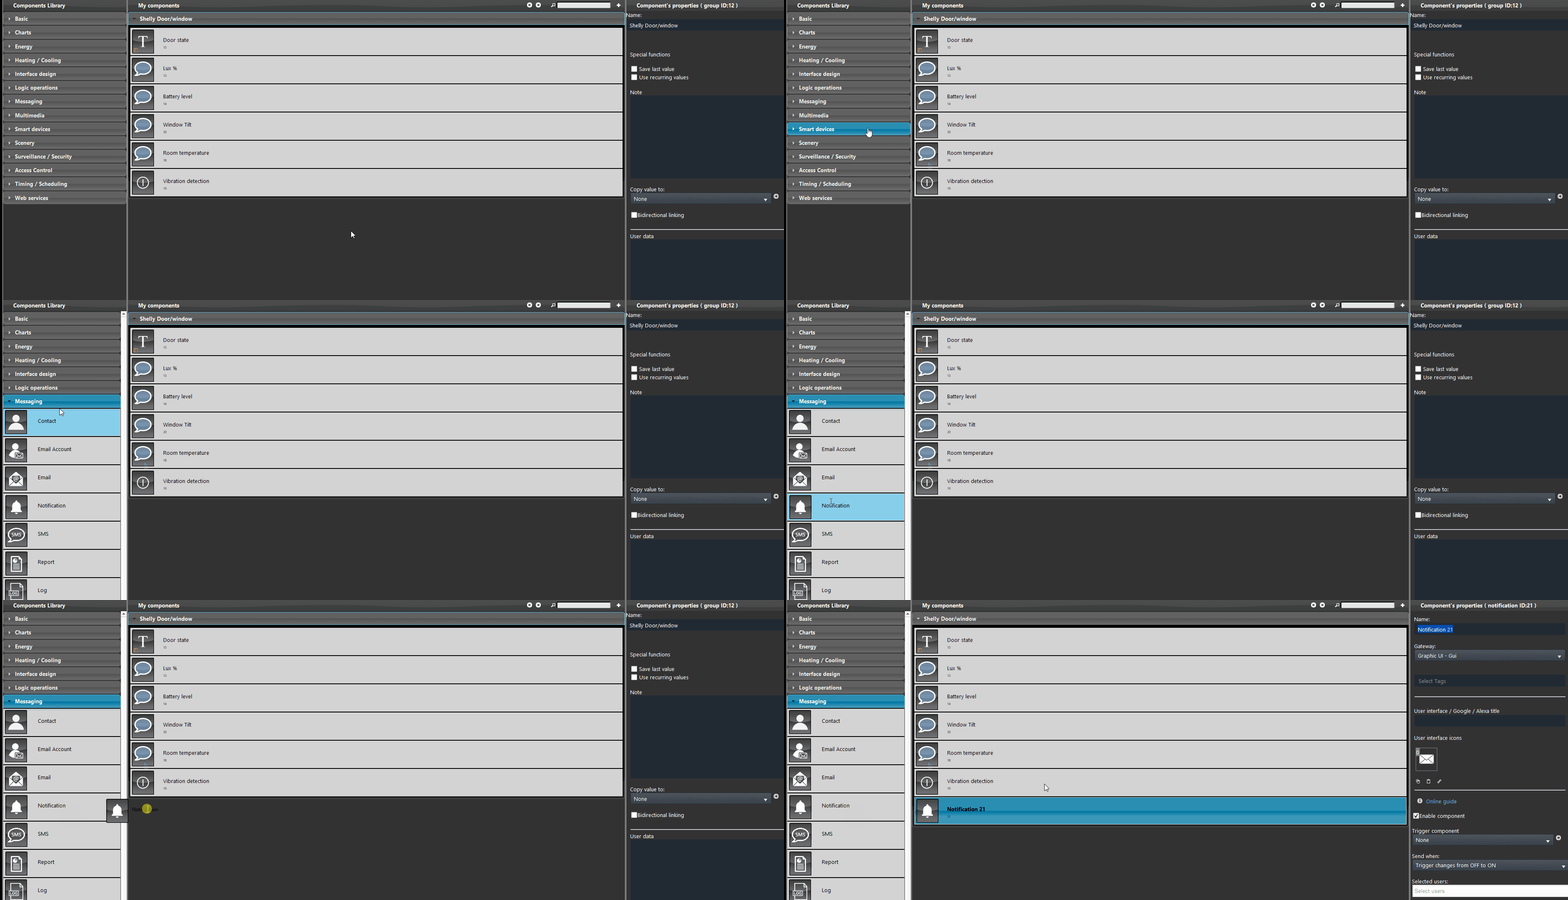
Add a Notifications component by dragging it from the Messaging section, on the left side of the Components section.
Step 1.2:
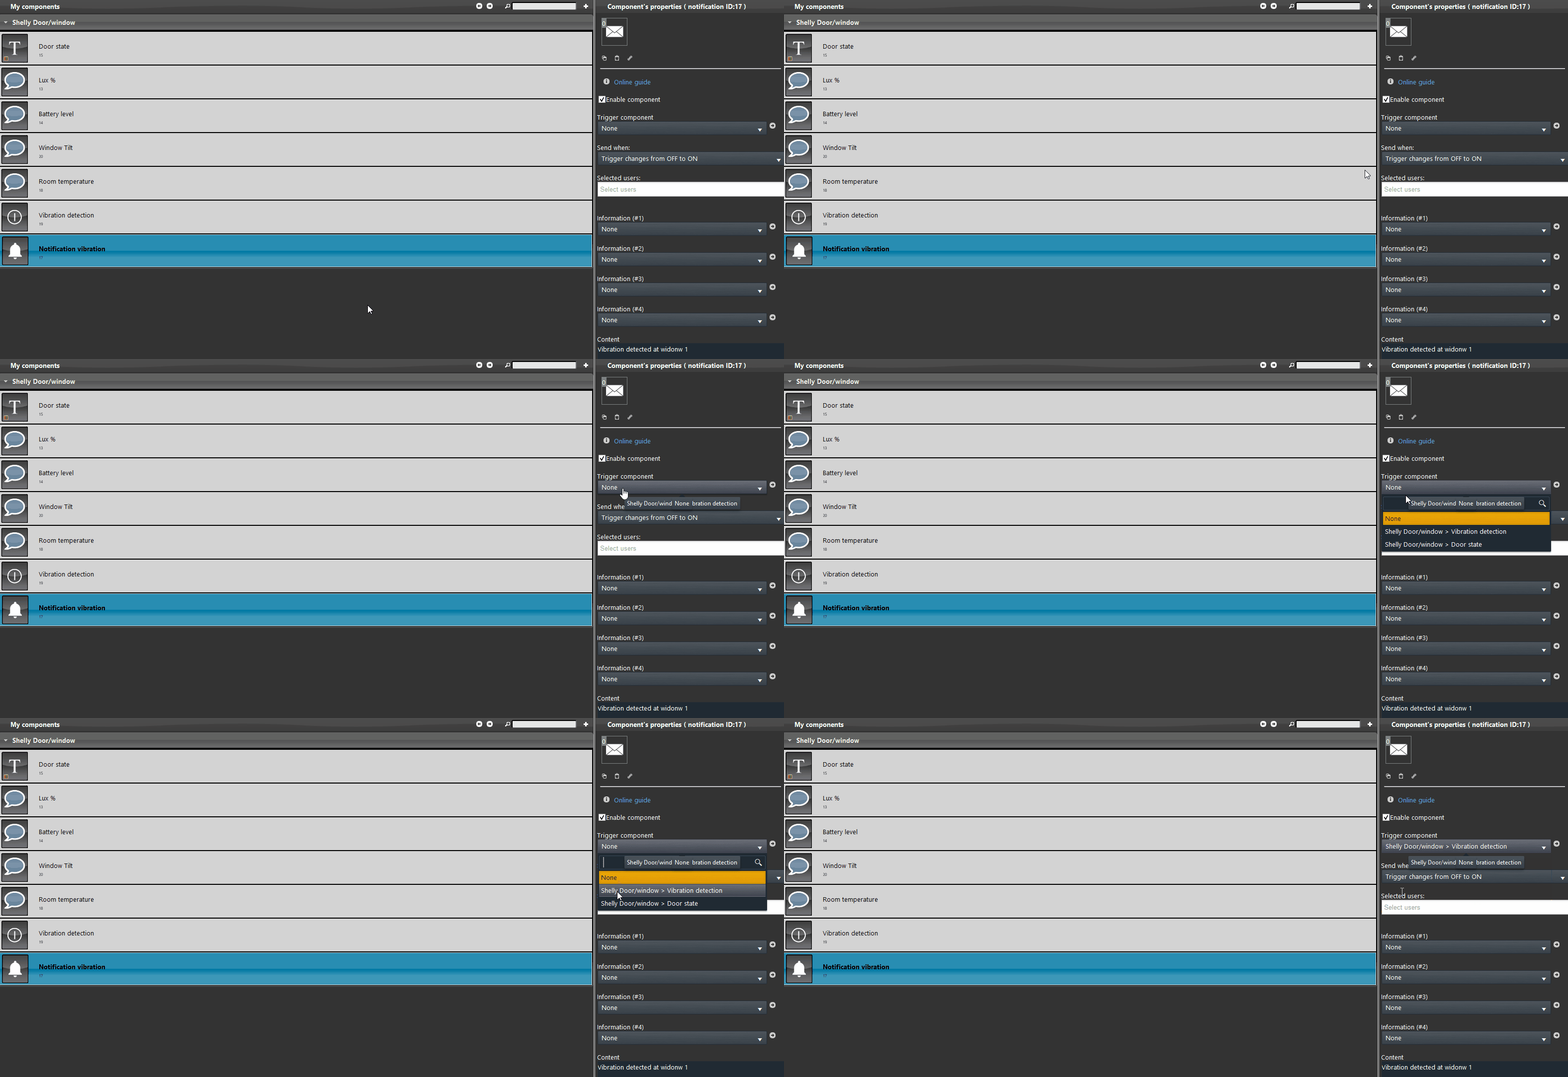
Now select the Button component as the trigger component in the Notification component properties.
Step 1.3:
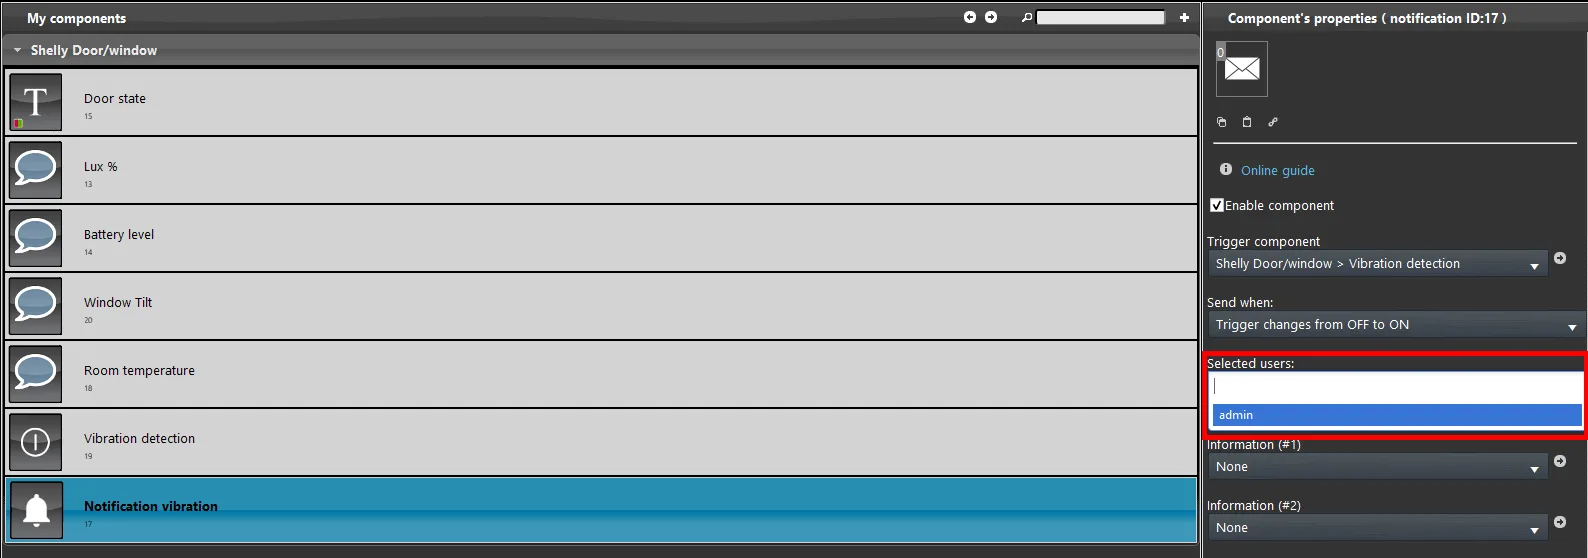
Now select the user who will receive the notification when the Shelly device detects a vibration: click the “Select user” options list and select the desired user.
Step 1.4:
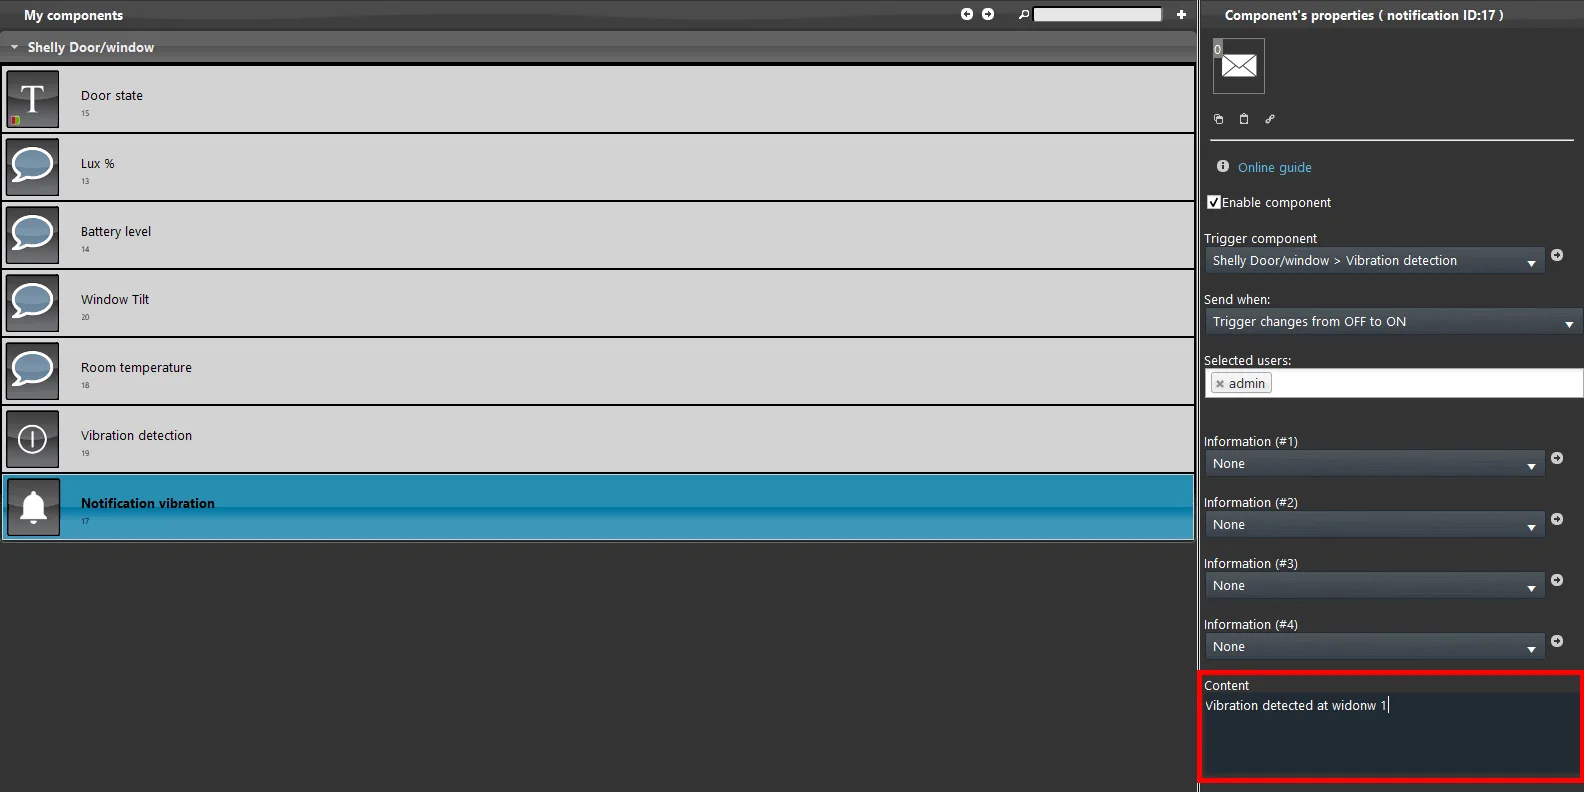
Once the user has been selected, set the notification content that users will receive. You can enter the most suitable information for your needs in the “Content” text field in the Notification component properties.
This completes the notification module setup.
Result in the user interface
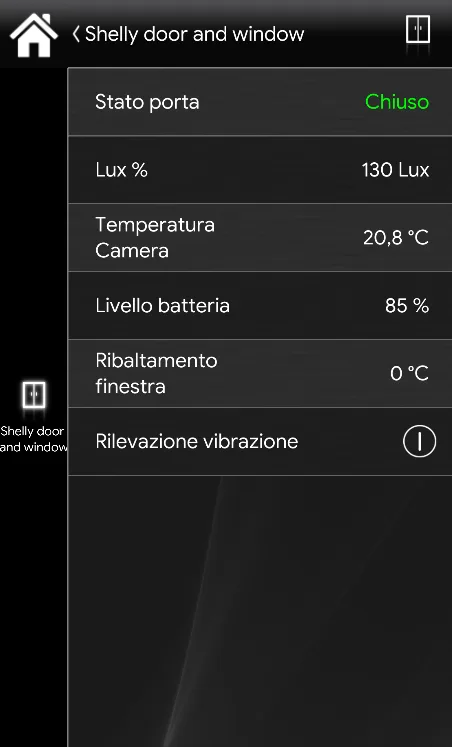
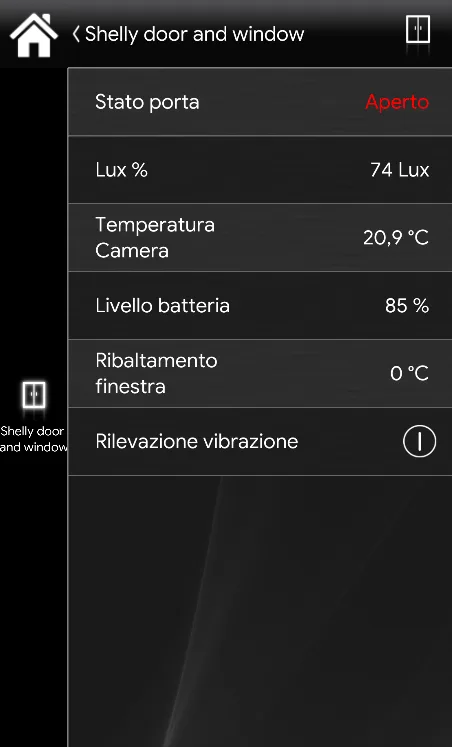
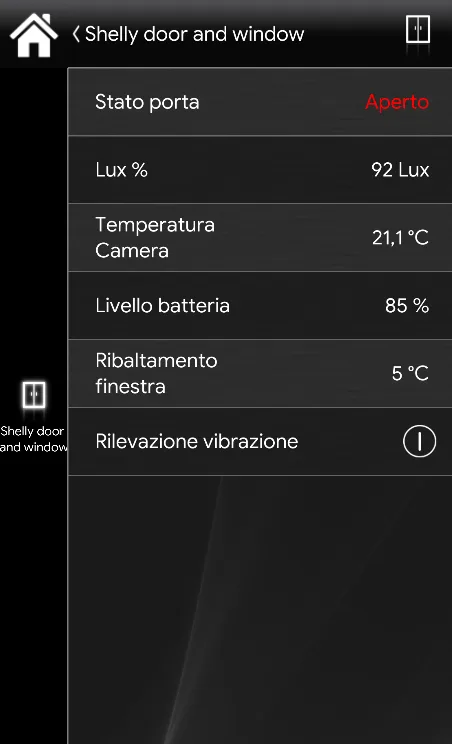
Now let’s test all configured components in the Ilevia Control app user interface.
Window closed
Window open
Window tilted
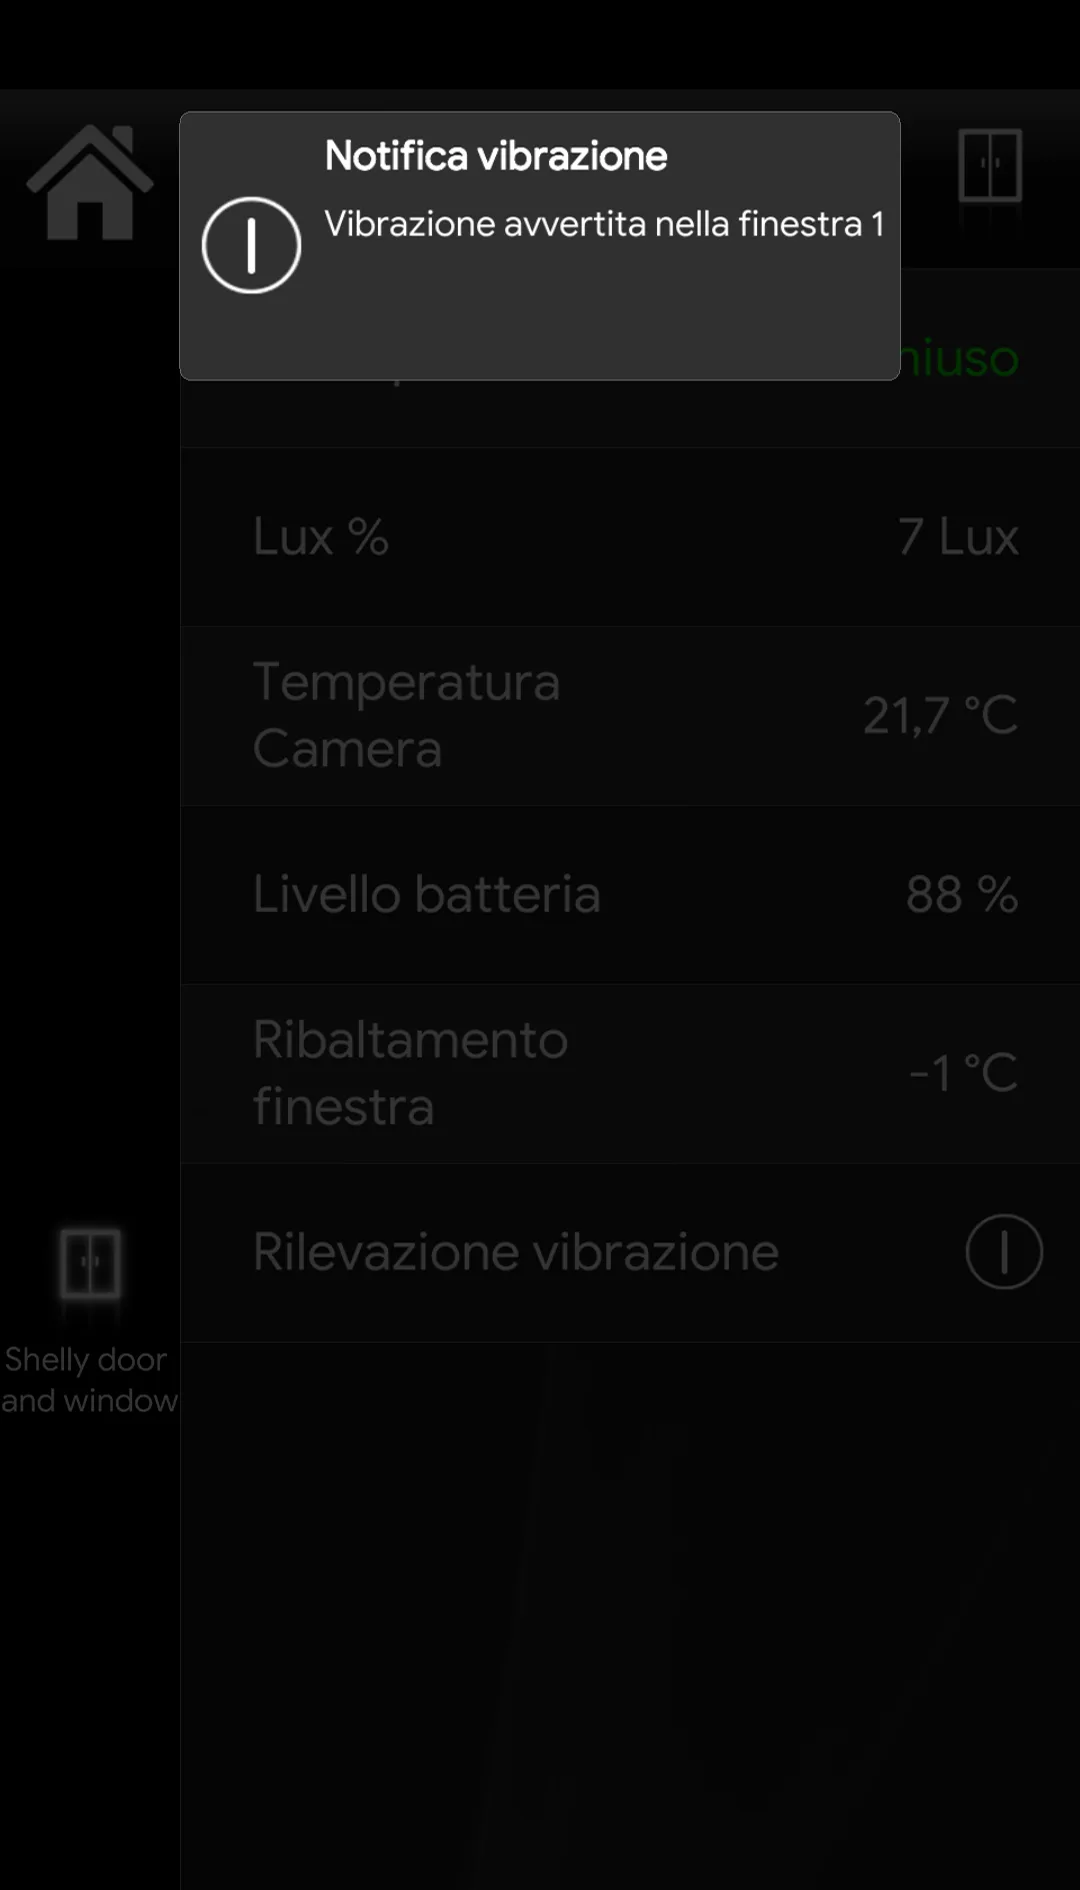
Notification display
This is how the notification is displayed in the Ilevia Control app when the Shelly device detects a vibration.
Troubleshooting
1- Make sure you have the latest available version of Ilevia Manager and the X1 server firmware.
2- Make sure the Shelly device is correctly connected to your network.
3- If you cannot connect the broker, check that the X1 has been configured correctly.